

How to Print Labels Like a Pro
How do I print labels?
Other articles you might like:
If you’re wondering how to print labels, you’re in the right place! With nearly a century of label expertise, we’ve answered just about every label-related question out there. Whether you want to DIY your labels or have them professionally printed, we’ve got you covered.
In this guide, we’ll walk you through everything you need to know—from choosing the right labels for your printer to designing and printing them like a pro. You’ll also get expert tips on troubleshooting common printing issues.
Before you print
Not sure if you should print labels yourself or go pro? Check out our guide on Printing Your Own Labels vs. Professional Printing to help you decide. Or watch our quick video below!
With Avery, you can order blank labels to print yourself or get custom labels printed by our experts with Avery WePrint—our professional label printing service. No matter what you choose, you can order online in minutes.
How to print labels
1. Buy the correct labels
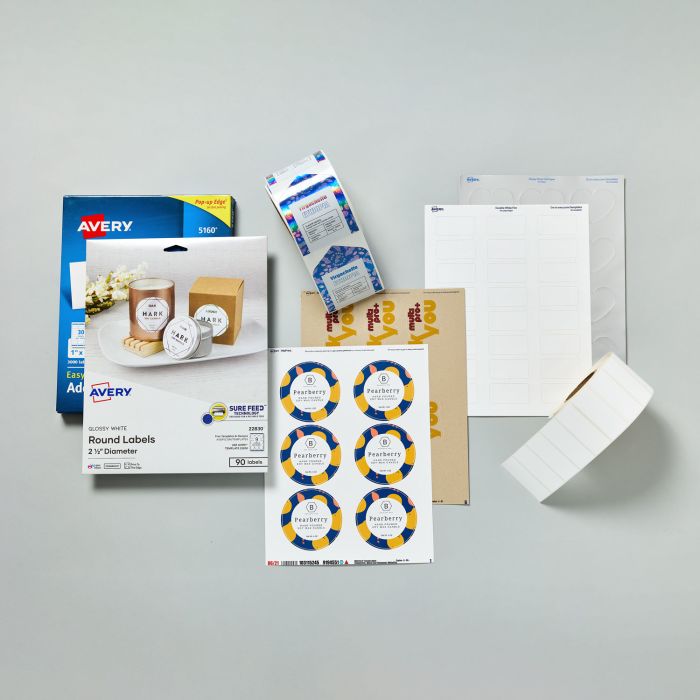
One of the biggest mistakes people make is using labels that aren’t compatible with their printer. Here’s what you need to know:
Inkjet vs. Laser Labels: Inkjet printers use liquid ink, while laser printers use toner. Using the wrong type can lead to smearing or flaking. Some Avery labels work with both, but always check the package to be sure.
How to Check Your Printer Type: Inkjet printers use small ink cartridges, while laser printers use larger toner cartridges. If you’re unsure, check your printer’s manufacturer website.
2. Pick the right labels for your design
Your label design can affect which type of label you should use.
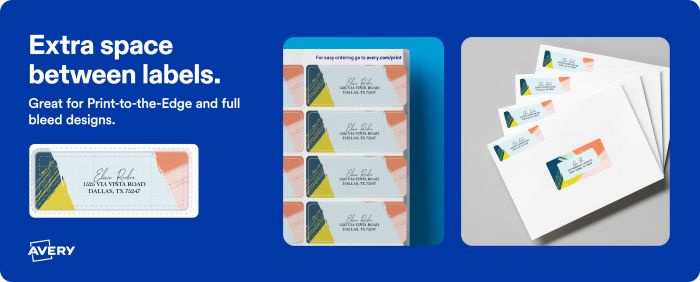
- Full-bleed (edge-to-edge) designs: Use print-to-the-edge labels to achieve seamless, borderless printing.
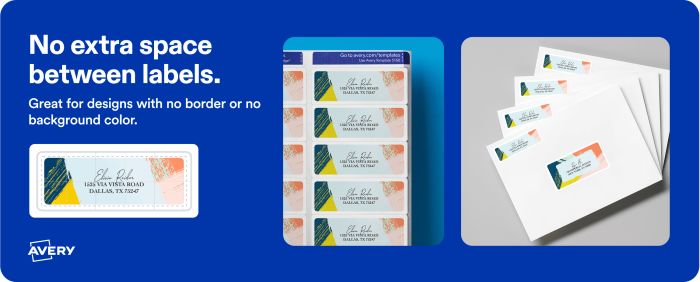
- Simple designs with borders: Labels with no gaps between them are best for neat, uniform borders.
- Large, custom shapes: Full-sheet labels let you print and cut unique sizes if you can’t find the exact shape you need.
? Pro Tip: If you’re printing a lot of full-color labels, using an inkjet at home may get expensive. Consider professional printing when DIY is becoming too much or you need a more professional look.
Labels without space between them are better for designs that use borders or no background color at all. This condensed layout also allows for more labels per sheet, making this more cost-effective. For example, address labels for mailing lists and file folder labels would work perfectly with this sheet design.
3. Use the correct Avery template
Using the wrong template is a common cause of misaligned prints. Only Avery templates are guaranteed to match Avery labels. Find your template number on the packaging or label sheet, then download the exact match from Avery’s website.
Design & Print Online makes it even easier by automatically aligning your design and showing safety areas so nothing gets cut off.
4. Understand the label printable area
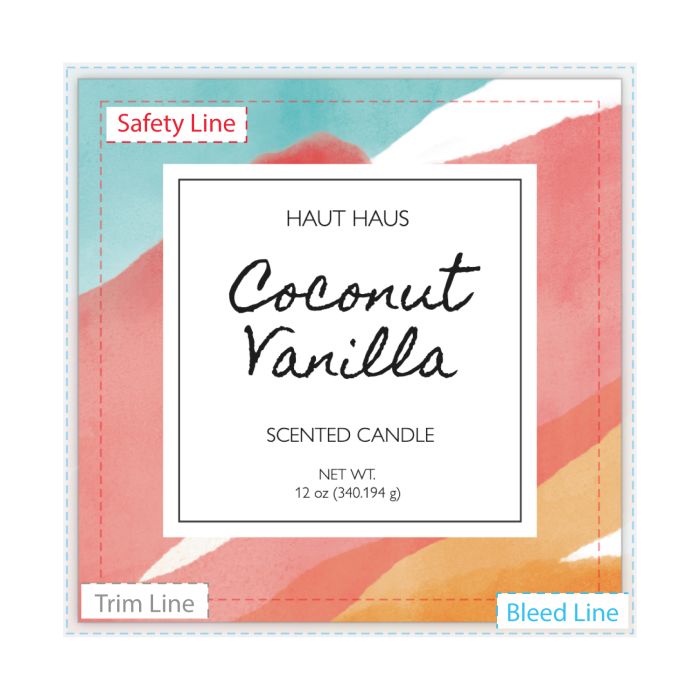
Labels have three key printing zones:
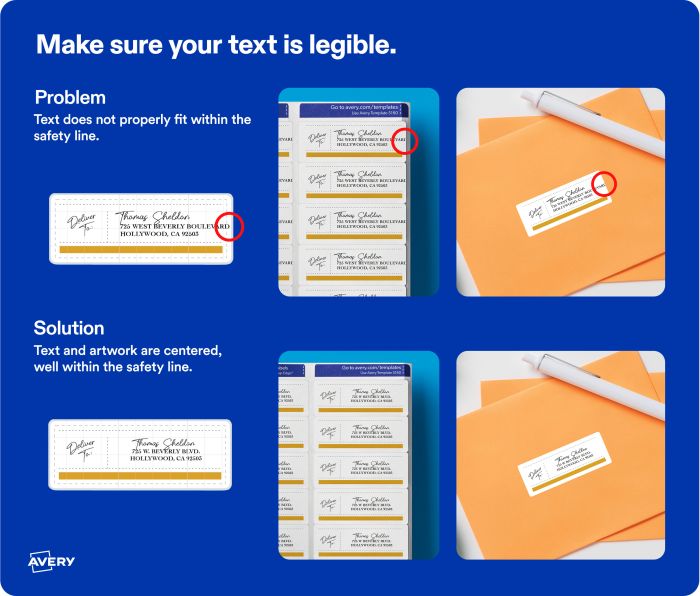
Safety area: The section that is guaranteed to print on the label. Keep all of your important content such as text and business logos within this area.
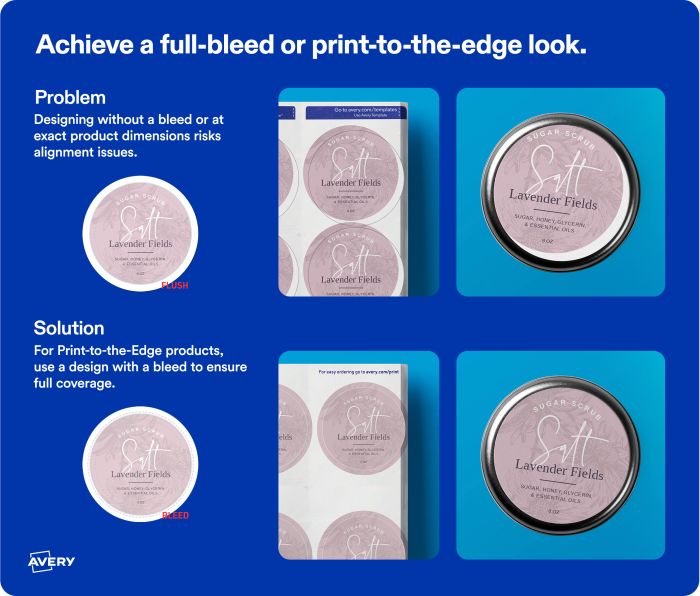
Bleed area: The extra design space outside the trim line that full-color backgrounds, images, and other content fill in order to have a print-to-the-edge or full-bleed design. Filling in this area ensures that there will not be any blank margins around your final label.
Trim area: The physical border of the label. This border will give you a good approximation of where your design will be cut off.
5. Design best practices
Unfortunately, printers aren’t perfect. It’s common for sheets to shift slightly during printing. However, you can optimize your design by using safe, trim, and bleed areas to make any slight misalignments less noticeable. We also have a few tips you can keep in mind depending on the type of design you plan to print.
Adding text
- Keep important details (like addresses and barcodes) inside the safety area.
- Use at least 7pt font for easy readability.
- Check font color contrast—make sure text is easy to read against the background.
Check out How To Pick the Right Fonts for Your Labels for more ideas. Also, make sure that your font color will stand out and won’t blend into the background. Note: If you are using our free barcode generator make sure your labels can be read by a barcode scanner.
Full-bleed printing
Not all labels support full-bleed printing, so choose print-to-the-edge labels if needed. Extend your design into the bleed area to avoid white edges.
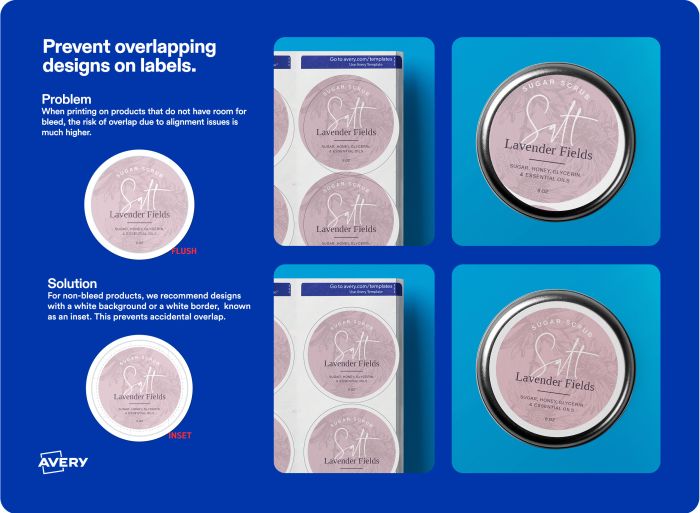
Avoid overlapping designs
If your label sheet has no spacing between labels, keep designs inside the safety area to prevent one design from spilling onto another.
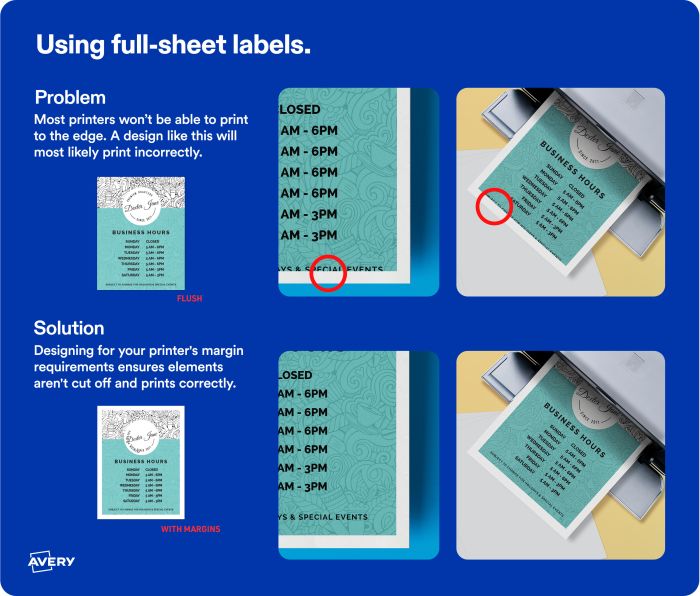
Using full-sheet labels
Most printers can’t print to the very edge of a full-sheet label. Check your printer’s non-printable margin and adjust your design accordingly.
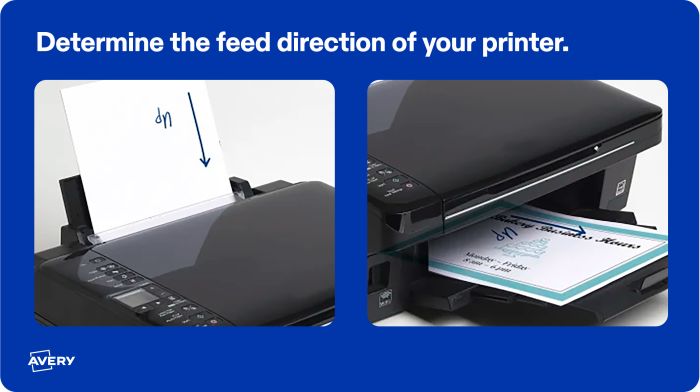
6. Printer setup & troubleshooting
Before you print
Adjust these key settings for the best results:
- Paper Size: Match the label sheet size (usually 8.5″ x 11″).
- Paper Type: Set to “Labels” or “Cardstock” for the best print quality.
- Scaling: Always set to 100% (Actual Size)—never “Fit to Page.”
Test before you print: Print on a blank sheet first to check alignment before using your labels.
Common printing issues & fixes
Labels not aligning?
- Check that you’re using the correct Avery template.
- Adjust print alignment in Design & Print Online.
- Confirm page scaling is set to “Actual Size.”
Paper jams?
- Use Sure Feed™ technology labels for a smoother feed.
- Fan label sheets before loading to prevent static cling.
- Print one sheet at a time to avoid jams.
Ink smearing?
- Make sure you’re using the right label type for your printer.
- Let ink dry before handling sheets.
White margins around the sheet?
- Most printers can’t print to the edge. Use full-bleed labels or order custom labels instead.
8. Print your labels or let us print for you
After making final adjustments, it’s time to print! Need perfectly aligned, professional-quality labels without the hassle? Let Avery WePrint handle it for you. We offer full-color, custom-printed labels with fast turnaround times—delivered right to your door.
Still need help? Our Consumer Care Team is ready to assist with any printing or design questions. Contact us at (800) 462-8379.
