

How to Make Planner Stickers: Your Complete DIY Guide
Ready to make your own planner stickers? Choose the right size and material, design with free Avery tools, then print and cut them at home.

How to make planner stickers
To make your own planner stickers, you will need a way to design your stickers, print them out, and cut the stickers so they can easily be peeled from their backing paper. There are different methods and tools for accomplishing these three steps, but we’re going to focus on the easiest way to make DIY planner stickers at home.
The trickiest part is often cutting the stickers so they peel away from the backing. You can use a cutting machine to create your own kiss cuts, but you don’t have to. Printable labels are already kiss cut, so you can design them with free software like Avery Design & Print Online, print them with a compatible home printer, and peel them right from the sheet.
- Design your planner stickers using free design software or a template.
- Print your planner stickers at home or have them professionally printed.
- Cut out your stickers with scissors, a cutting machine, or skip cutting by printing on label sheets.
Choose how to make your planner stickers
There are three main ways to make DIY planner stickers at home. First, you can print your designs on label sheets with labels that are already kiss cut in one uniform size and shape. Since the cutting is already done, you won’t need a special cutting machine.
Second, you can print on full-sheet sticker paper, then cut out individual stickers by hand or use a cutting machine to create your own kiss cuts. Third, you can have custom sticker sheets printed for you. This option is especially useful if you plan to sell your planner stickers and want to add branding to the entire sheet.
What does kiss cut mean? Planner stickers are generally kiss cut, meaning that the top layer of the sheet is cut but the backing is not. This creates a sheet where individual stickers can easily be peeled away. Learn more about the difference between kiss-cut and die-cut stickers.
What do I need to make my own planner stickers?
- A laptop, computer, tablet, or compatible mobile device
- Printable labels or full-sheet sticker paper
- Design software
- A blank template or a predesigned DIY planner sticker template
- A compatible inkjet or laser printer
- Optional: scissors, a paper trimmer, or a cutting machine
How Avery tools can help you make planner stickers
Avery offers free design tools, templates, printable materials, and custom-printing options to make DIY planner stickers. Here’s how to use Avery tools for each part of the process.
Printable labels or sticker paper
You can print DIY planner stickers on label sheets that are already kiss-cut or full-sheet sticker paper. Since labels are already kiss cut, your individual stickers peel directly from the backing. Full-sheet sticker paper gives you more freedom to create custom sizes and shapes, but you will need to cut out the stickers by hand or use a craft cutting machine. Whichever option you choose, make sure the material is compatible with your inkjet or laser printer.
Matte vs. glossy sticker paper: Which is better?
Neither finish is always better for DIY planner stickers. Matte sticker paper has a nonreflective finish and is generally easier to write on, making it a practical choice for reminders, trackers, and other functional stickers. Glossy sticker paper has a smooth, shiny finish that can make colors and decorative designs stand out.
Choose the finish based on how you plan to use your stickers, and make sure the material is compatible with your printer. For a closer look at both options, read our full guide to choosing between matte and glossy finishes.
Free design tools for making stickers
Avery Design and Print Online is our free software that has all the standard tools you need to design DIY planner stickers, plus free design templates. You can also create a free Avery account to save your projects and return to them later.
Templates to start designing quickly
Once you’ve chosen your labels or sticker paper, enter the Avery product number on our template finder page. Select the template for your product, then click “Start Designing” to browse free printable designs and customize one with our free software.
Prefer to use another design program? You can also download a blank template for your product and use it with software such as Adobe Illustrator®, Microsoft Word®, or Apple Pages®.
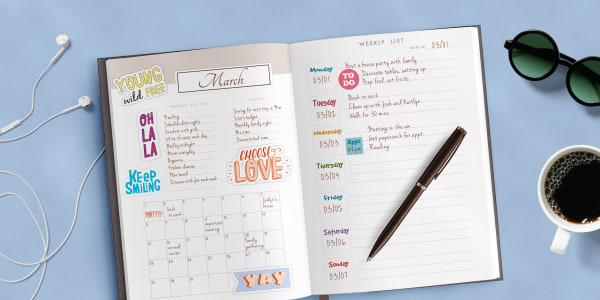
How to choose a planner sticker size
Size and shape are often a personal preference. But when you’re making DIY planner stickers, it helps to start with the space where you plan to use each sticker. Measure the calendar box, header, margin, or other area you want to fill. You can also print your designs on plain paper first and place them in your planner to check the size before printing on labels or sticker paper.
Some common planner sticker sizes include:
| Common use | Sizes to consider |
|---|---|
| Appointments, reminders, and small icons | 1/2″ or 3/4″ rounds and squares |
| Day and date covers | 1/2″ × 1-3/4″ rectangles |
| Calendar boxes and decorative stickers | 1″ to 2″ rounds or squares |
| Headers | 1″ × 4″ or 2″ × 5″ rectangles |
| Full sticker sheets | 8-1/2″ × 11″ |
These are simply starting points. Planner layouts vary, so the best size will depend on how you plan to use the stickers.
How to make DIY planner stickers in custom sizes
If you don’t see a standard label size that works for you, custom sizes and shapes can be achieved in three ways: printing at home on 8-1/2″ × 11″ sticker paper or other full-sheet labels, ordering blank labels by the sheet in custom sizes, or using a custom-printing service.
At home, you can create DIY planner stickers in nearly any size or shape using full-sheet sticker paper, which comes in a variety of materials, colors, and finishes. Simply print your designs, then cut them out with regular scissors or a craft cutting machine.
You can also order blank labels by the sheet. Start on the blank labels page, choose a shape, then enter the dimensions you need—from 1/2″ to 10″ in width, height, or diameter—at no extra charge.
If you’re making planner stickers to sell, you can print on 8-1/2″ × 11″ label sheets and trim the finished sheets to a smaller size, such as 4″ × 6″ or 5″ × 7″. Custom-printed sticker sheets are another option when you want to add branding or other information to the sheet itself.
How to design your own planner stickers for free
Once you’ve chosen your labels and opened the matching template, decide where you want to create your design. You can work in our free software or use another design program, such as Microsoft Word®, Canva®, Adobe Illustrator®, or Adobe Photoshop®.
Design your stickers with our free software
Choose a predesigned Avery DIY planner sticker template to customize or start with a blank design. Once the Customize screen is open, you can add and edit images, shapes, and text in a variety of fonts and colors.
Pro tip: Use Edit All to apply the same design to every label on the sheet. Use Edit One to create several different planner stickers on a single sheet.
Advanced tip: Once you’ve saved your project, you can reuse the design on labels in another size, color, or finish. Select Change Template from the Customize screen or Apply Design to Another Product from Preview & Print or your Avery account.
How do I make DIY planner stickers in Word?
Start by downloading the Microsoft Word template for your Avery product. Open the template in Word, then use the available tools to add your planner sticker designs. When you’re ready, print directly from Word using the recommended settings for your labels or sticker paper.
How do I upload a design from Canva?
Download your finished Canva design as a PNG, JPG, or PDF. Then open a blank template for your Avery product in our free design software and upload the file. Resize and position your design within the template, then preview the sheet to check how it will print on your Avery product.
How to print your own planner stickers
What kind of printer do I need for printing stickers?
Basically, standard Avery label sheets and sticker paper products are designed to work on a huge variety of common desktop and office printers— if you have a laser or inkjet printer, you’re probably good to go. Indeed, the process and equipment for printing labels and printing stickers are essentially the same.
As with printing any kind of labels, the type of printer you use for printing stickers is not as important as making sure you have the right kind of stickers to use with it. Specifically, using inkjet stickers or labels for inkjet printers and laser stickers or labels for laser printers.
Tips for printing your own planner stickers
Our number one tip is to always print a test sheet on plain paper first. For one thing, it helps you to make sure the sheets are fed in the right direction. Another reason is to check alignment. If the scale is off, or the designs go “out of bounds” into the margins, generally it will be easy to tell right away.
Pro Tip: Place your test paper over the blank label sheet you’re going to print on. Hold them up to a bright light to check for alignment between the design and the Avery label sheet.
Another essential tip is to always set your paper type to “labels,” “cardstock,” “heavy weight,” or “specialty.” This is important so that your printer can adjust the feed to accommodate sheets that are thicker than regular paper. Additionally, you want to make sure that the scale is set to 100% so that your design prints at the exact intended size and alignment for the label sheet.
If your test sheet doesn’t come out right, you can go back and test printer settings until it’s correct. In fact, we have a fantastic help article just for troubleshooting printing issues. Or, you can call our Customer Care team to help troubleshoot the problem and walk you through the process.
How to print your own planner stickers, with pictures
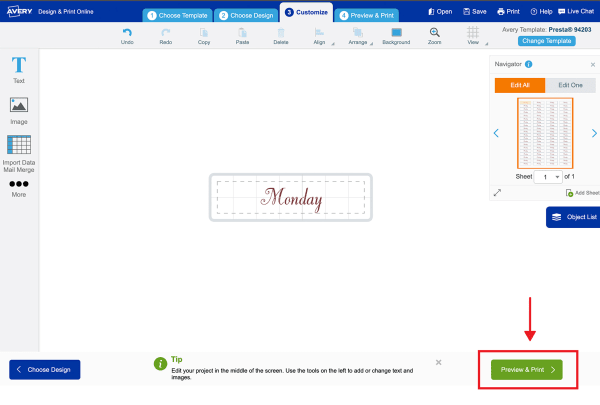
1) Preview & Print
Once you’re happy with your design, click the green “Preview & Print” button.
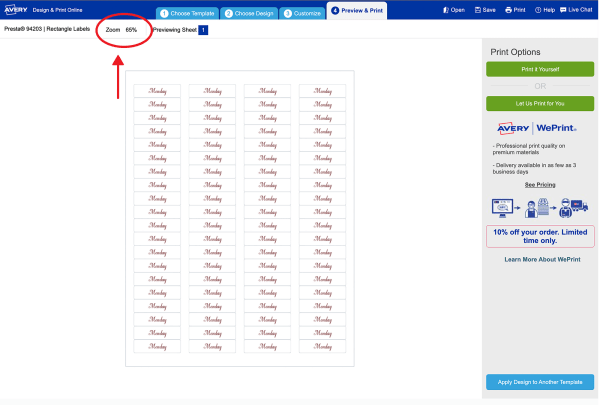
2) Review your design
On this screen you will be able to zoom in to review the designs on each sheet in your project.
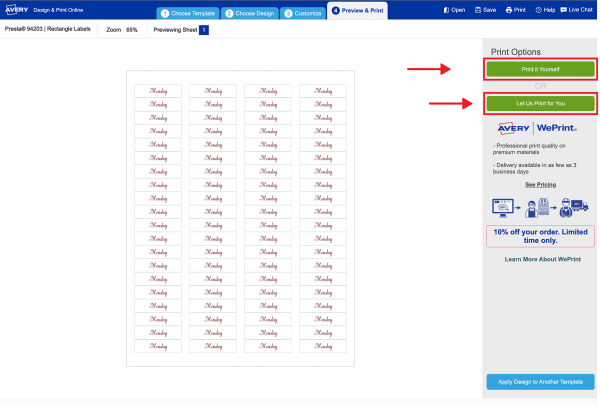
3) Choose print yourself
To print at home, choose “Print Yourself” and proceed to step 4. Otherwise, choose “Let Us Print for You” and follow the prompts.
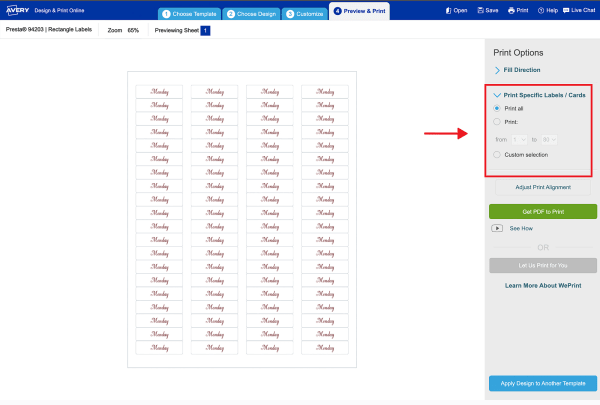
4) Choose printer options
Next, you will be prompted to choose some printer options.
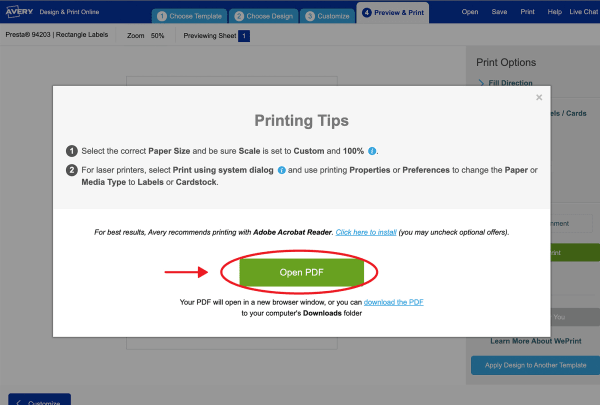
5) Get PDF to Print
Glick “Get PDF to Print.” First you will be prompted to save your design. Then a window will pop up with a button to open the PDF.
Opening the PDF may vary between browsers. This video walks you through the steps for printing from different internet browsers.
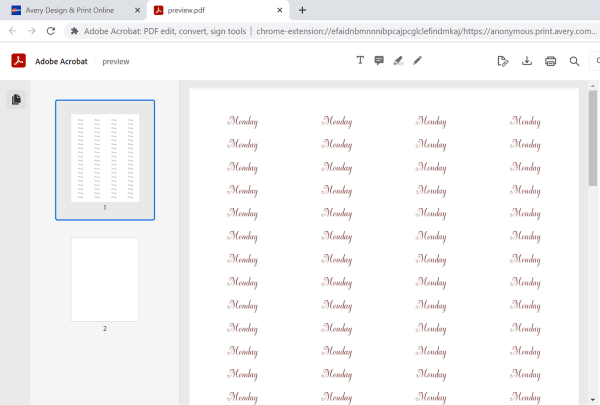
6) Review the PDF
Always review your PDF file before printing. The first preview in step 2 shows you the designs on individual sheets. The PDF file that opens in a new window shows you exactly what your whole project will look like
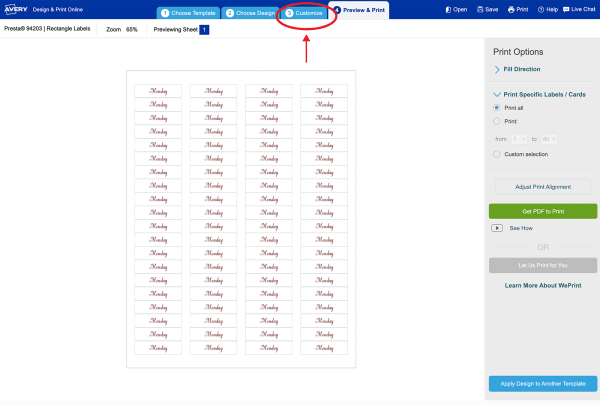
7) Print (or go back to edit)
If you’re not ready to print, go back to the ADPO tab in your browser. Then use the “Customize” tab to continue editing. Remember to review any changes you make in the new PDF file that will be generated.
How to print on 4″ × 6″ label sheets
Printing on Avery 4″ × 6″ label sheets can be awesome for making DIY planner sticker sheets that fit nicely in planner pockets. The absolute first thing to check is whether your specific printer model supports non-standard sheet sizes. You can confirm that with the manufacturer or look closely at your printer’s paper feed and see if there is an adjustable printing guide you can slide.
The steps for printing non-standard sheets can vary by both make and model, but this video on our YouTube channel can help walk you through it.
How to cut planner stickers
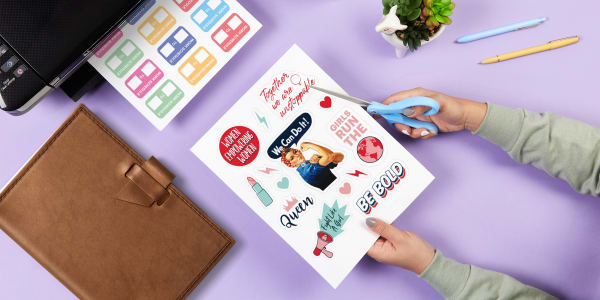
There are two ways to cut DIY planner stickers: cut them out by hand or use a craft cutting machine to create kiss cuts. If neither option works for you, printable label sheets let you skip cutting. The labels are already kiss cut in one uniform size and shape. You can also order custom-printed sticker sheets.
- Cut stickers by hand. Print your designs on sticker paper or full-sheet printable labels, then use regular scissors to cut out individual stickers. You can also use a paper trimmer to create straight edges or trim a finished sticker sheet to a smaller size.
- Use a craft cutting machine. A cutting machine can kiss cut the top layer of sticker paper without cutting through the backing. This creates a sheet where the individual stickers can be peeled away.
- Skip the cutting process. Print on label sheets with uniform, kiss-cut labels or have custom sticker sheets printed for you.
Can I make planner stickers without a Cricut®?
Yes. If you print on sticker paper, full-sheet labels, or 4″ × 6″ label sheets, you can cut out individual planner stickers with regular scissors. You can also trim the finished sheet with a paper cutter.
However, cutting by hand does not create traditional kiss cuts. If you want individual stickers that peel from a single backing sheet, printable label sheets are the easiest option without a cutting machine. Just remember that every label on the sheet will have the same size and shape.
You can print on a regular 8-1/2″ × 11″ label sheet, then trim the sheet after printing if you want it to fit in a planner pocket or create a smaller sticker sheet. Custom-printed sticker sheets are another option when you want a finished, kiss-cut sheet without cutting it yourself.
Can I cut Avery sticker paper with a Cricut?
Yes. You can print your designs on 8-1/2″ × 11″ Avery sticker paper, full-sheet labels, or 4″ × 6″ label sheets, then place the printed sheet on a Cricut mat for cutting. Use a compatible Cricut machine with Print Then Cut to create custom shapes or kiss-cut planner sticker sheets. Make sure the material matches your printer type and that your design fits within the Print Then Cut size limits.
Cricut Design Space® is free, and you can set up sticker cuts without a subscription. However, the free method uses an older, more manual workflow that can be finicky for beginners. Cricut Access® includes the more convenient Create Sticker workflow, which guides you through setting up kiss cuts and other sticker options.
This cutting step is intended for uncut, full-sheet material. Avery label sheets with uniform, kiss-cut labels generally do not need to be cut with a Cricut.
Start making your own planner stickers
Now you’re ready to choose a material that fits how you want to make and use your planner stickers. Printable label sheets are the easiest option if you want to skip cutting, while sticker paper or full-sheet labels give you more freedom to create custom shapes. You can also order custom-printed sticker sheets when you want a finished, branded option.
Once you have your Avery product, use the product number to open the matching template and start bringing your planner sticker ideas to life.


