

A Complete DIY Guide for How to Make Planner Stickers
How to make planner stickers
To make your own planner stickers you will need a way to design your stickers, print them out, and cut the stickers so they can easily be peeled from their backing paper. There are different methods and tools for accomplishing these three steps, but we’re going to focus on the easiest way to make DIY planner stickers at home. You can even use the links in the list below to navigate to the section you need!
- Design your stickers using the design software of your choice
- Print out your planner stickers at home or have them printed for you
- Cut out your stickers: kiss cut sheets, cut out individuals, or skip cutting by using smaller label sizes
General tips for making DIY planner stickers at home
First, instead of spending money to purchase or subscribe to design software, create your stickers using free online software. For example, Avery Design and Print Online (ADPO). Secondly, print your DIY planner stickers on label sheets or have them printed for you. Sheet labels in any size smaller than 8-1/2″ x 11″ (a.k.a. full sheet labels) are already kiss cut. And, you can order printable blank labels by the sheet, as well as custom-printed sheet labels, in custom sizes.
Cutting out DIY planner stickers can be tricky because kiss cutting requires a special machine. However, you can avoid this by opting for individual stickers cut out by hand or simply using labels to create your stickers.
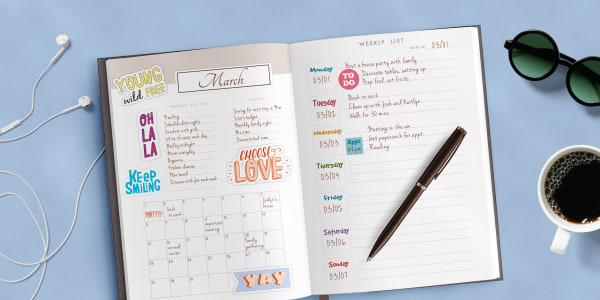
Why do people put stickers in planners?
Planning is about more than just organizing your schedule. Although there are fantastic ways to use your planner to be more productive, using your planner or bullet journal is a way to express your creativity. Not to mention helping you to make time to focus on your dreams and goals. With this in mind, people use decorative planner stickers to add personal details and turn their planners into works of art.
On the other hand, planner stickers have some very practical uses too. For instance, stickers for appointments and reminders, day/date covers, filling calendar boxes, and custom headers. Of course, DIY planner stickers give you more options to customize how you use stickers to decorate your planner and organize your time.
What do I need to make my own planner stickers?
Design tools
Firstly, you need a way to design your stickers. Many people use standard design software such as the Adobe suite (Photoshop, InDesign, Illustrator, etc.). However, Avery Design and Print Online (ADPO) is free software with all the standard tools you need to design DIY planner stickers.
Templates
ADPO covers tools, but where to start designing DIY planner stickers? Begin by going to the Avery template finder page and enter your Avery product number. Then click the label template thumbnail. Once on the template page, you can design your labels in ADPO by using the “Start Designing” button which will take you to a gallery of free printable designs. You can also download the templates for your product to use with desktop software including the Adobe suite, Microsoft Word, and Apple Pages.
Hardware and Wi-Fi
To begin with, you will need a laptop, computer, or smart device connected to the internet to use ADPO and free Avery templates. A free Avery account is also a great idea for saving your projects. Additionally, if you want to print your planner stickers yourself you’ll need access to a laser or inkjet printer. Of course, we can also print DIY planner stickers for you with our WePrint® service.
DIY planner sticker supply checklist
- Laptop, computer, or smart device
- Free Avery account
- Internet connection
- Laser or inkjet printer
- Printable label sheets
- Optional: craft cutting machine
What size should planner stickers be?
Although size and shape are often a personal preference, you might want to consider some common planner sticker sizes for certain uses. Of course, our DIY planner sticker in-store packs are a great starting point. However, blank labels by the sheet are very useful for printing one or two sheets of stickers in a variety of shapes and sizes. In fact, you can even order blank labels by the sheet in custom sizes! Here are some quick links to by-the-sheet labels in common planner sticker sizes.
| Common Use | Best Dimensions |
| Filling calendar boxes | 1″ square 1-1/2″ round 1-1/2″ square 2″ round 2″ square 1″ x 2″ ovals |
| Headers for A5 pages | 2″ x 5″ rectangle 1″ x 4″ rectangle |
| Decorate A5 cover/ dividers | 5″ x 7″ rectangle 5″ x 8-1/8″ rectangle |
| Date & date covers | 1/2″ x 1-3/4″ rectangle |
| Appointments & reminders | 1/2″ round 3/4″ round 3/4″ square 1/2″ x 1-3/4″ rectangle |
| Unique decorative shapes | 3/4″ hearts 3/4″ stars 1″ starbursts |
| Making planner sticker sheets | 8-1/2″ x 11″ |
How to make stickers in custom sizes for your planner
If you don’t see a standard label size that works for you, custom sizes and/or shapes can be achieved in three ways: (1) printing at home on 8-1/2″ x 11″ sticker project paper or other full-sheet labels, (2) ordering blank labels by the sheet in custom sizes, or (3) using our custom-printing service.
At home, you can create DIY planner stickers in any size or shape that you can imagine using sticker paper and full-sheet blank labels, which come in a variety of materials, colors, and finishes. Simply print your designs on the sticker paper or label sheets then cut them out with regular scissors or popular cutting machines for crafting.
Or, order blank labels by the sheet. Start on the blank labels page, choose a shape, then enter the dimensions of your choice (up to 8″ x 10″) at no extra charge. Similarly, you can create DIY planner stickers in custom sizes through our custom-printing service. Start on the custom labels page, choose a shape, follow the steps, and enter the dimensions you want.
Designing custom planner stickers: Avery Design and Print Online
Using ADPO you can design personalized DIY planner stickers in three different ways: (1) browse Avery designs that you can modify, (2) create your own design from scratch using ADPO design tools, or (3) upload a design from your computer.
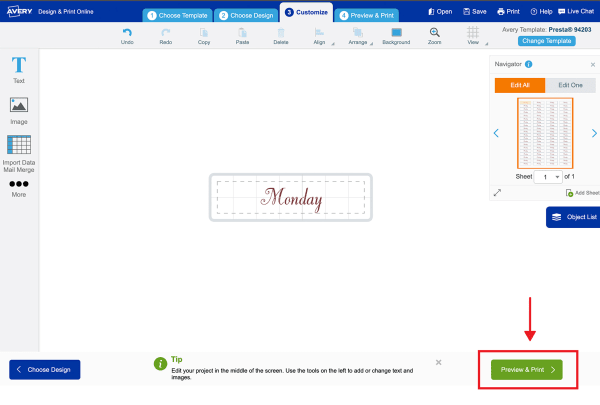
If you choose to browse our designs, you will be prompted to pick a design to customize. Once a choice is made, you will be taken to the customize screen where you can personalize your planner sticker design.
Once the ADPO customize screen is open, you can insert and edit images, shapes, and text in a variety of fonts and colors. You can also edit just one planner sticker, or all the planner stickers on a single sheet using the Edit One and Edit All feature.
How to find free Avery templates to make stickers
We mentioned above that you can quickly find a template for any Avery product by going to Avery templates and entering the Avery product number. Using your product number is certainly the quickest way. However, you can also find templates in blog articles, like this one filled with DIY decal sticker templates that would be great for decorating a planner. Or, this article full of free printable Christmas planner stickers.
If you have your labels in front of you, the product number is found on the packaging or at the top of the label sheet. You can also find the right template for any project by clicking the template link on the product page. Or, check out these instructions (with pictures) for finding Avery templates.
Applying your planner sticker designs to different labels
Reusing your personalized designs on different labels can be useful when you want to create additional DIY planner stickers in different sizes or different colors and finishes.
Once you’ve saved your project in ADPO, you can apply the design to different Avery labels in three different ways.
- From ADPO, in the Customize tab, click the Change Template button at the top right
- Or, go to the Preview & Print tab, click Apply Design to Another Product
- From your Avery account, click on your saved planner sticker project, then click Apply Design to Another Product
Printing DIY planner stickers
What kind of printer do I need for printing stickers?
Basically, standard Avery label sheets are designed to work on a huge variety of common desktop and office printers— if you have a laser or inkjet printer, you’re probably good to go. Indeed, the process and equipment for printing labels and printing stickers are essentially the same.
As with printing any kind of labels, the type of printer you use for printing stickers is not as important as making sure you have the right kind of stickers to use with it. Specifically, using inkjet stickers or labels for inkjet printers and laser stickers or labels for laser printers. In fact, we go into a lot of detail about that in our article about what kind of printers you need for printing labels.
However, when printing DIY planner stickers quantity and quality are also considerations. If you are regularly printing a large quantity of stickers, you may want to consider using a laser printer. Laser printers use heat and toner instead of ink so you can go a lot longer without refilling the printer.
On the other hand, if your DIY planner stickers feature many colors, saturated color, or photos, inkjet may be a better choice. Inkjet printers are better for printing designs with complex color depth and tonal range.
Tips for printing your own planner stickers
Our number one tip is to always print a test sheet on plain paper first. For one thing, it helps you to make sure the sheets are fed in the right direction. Another reason is to check alignment. If the scale is off, or the designs go “out of bounds” into the margins, generally it will be easy to tell right away.
Another essential tip is to always set your paper type to “labels,” “cardstock,” “heavy weight,” or “specialty.” This is important so that your printer can adjust the feed to accommodate sheets that are thicker than regular paper. Additionally, you want to make sure that the scale is set to 100% so that your design prints at the exact intended size and alignment for the label sheet.
If your test sheet doesn’t come out right, you can go back and test printer settings until it’s correct. In fact, we have a fantastic help article just for troubleshooting printing issues. Or, you can call our Customer Care team to help troubleshoot the problem and walk you through the process.
How to print your own stickers, with pictures
1) Preview & Print
Once you’re happy with your design, click the green “Preview & Print” button.

2) Review your design
On this screen you will be able to zoom in to review the designs on each sheet in your project.
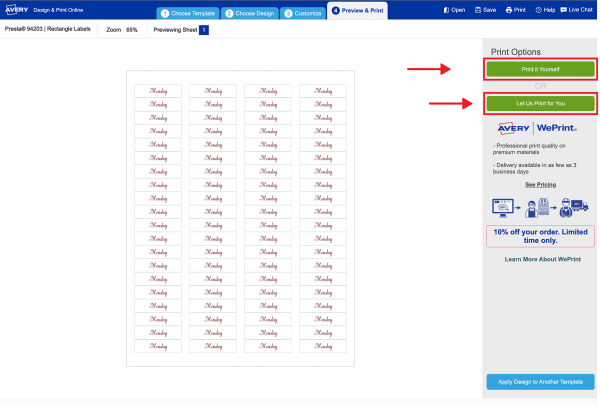
3) Choose print yourself
To print at home choose “Print Yourself” and proceed to step 4. Otherwise choose “Let Us Print for You” and follow the prompts.
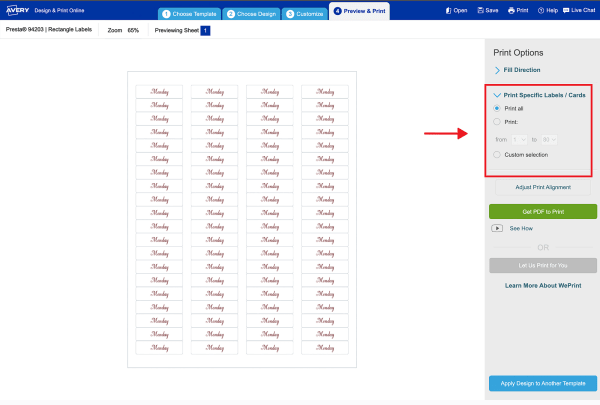
4) Choose print options
Next, you will be prompted to choose some print options.
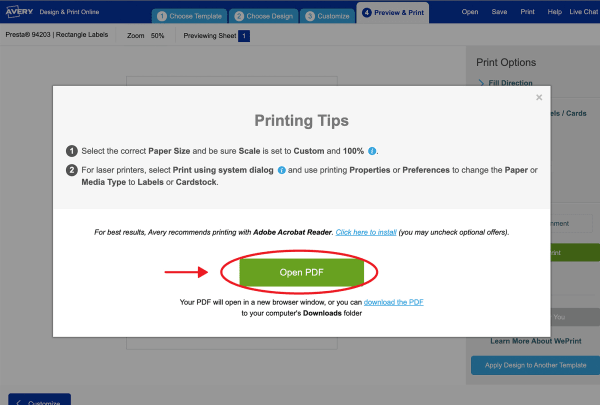
5) Get PDF to Print
Glick “Get PDF to Print.” First you will be prompted to save your design. Then a window will pop up with a button to open the PDF.
Opening the PDF may vary between browsers. This video walks you through the steps for printing from different internet browsers.
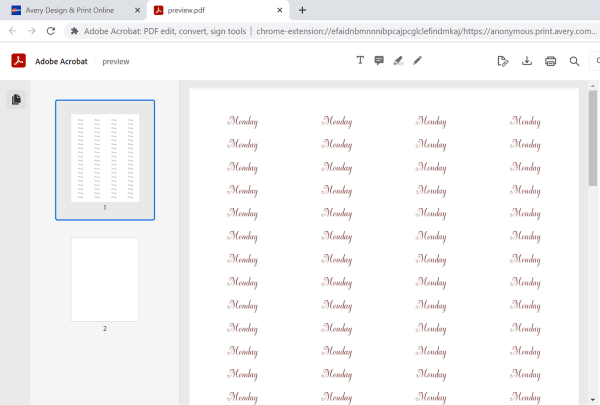
6) Review the PDF
Always review your PDF file before printing. The first preview in step 2 shows you the designs on individual sheets. The PDF file that opens in a new window shows you exactly what your whole project will look like
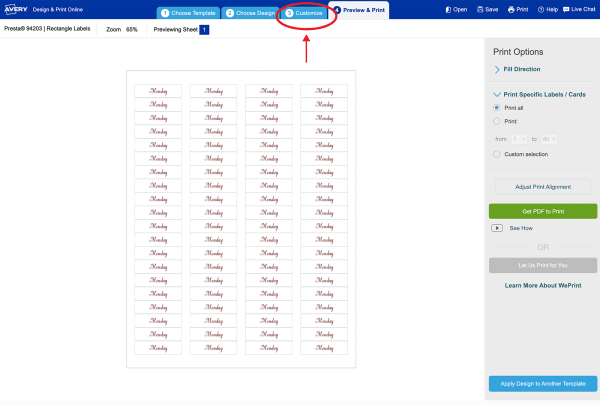
7) Print (or go back to edit)
If you’re not ready to print, go back to the ADPO tab in your browser. Then use the “Customize” tab to continue editing. Remember to review any changes you make in the new PDF file that will be generated.
How to print on 4″ x 6″ label sheets
Printing on Avery 4″ x 6″ label sheets can be awesome for making DIY planner sticker sheets that fit nicely in planner pockets. The absolute first thing to check is whether your specific printer model supports non-standard sheet sizes. You can confirm that with the manufacturer or look closely at your printer’s paper feed and see if there is an adjustable printing guide you can slide.
Additionally, the steps for printing non-standard sheets can vary by both make and model. For example, some printers may require that you change settings or simply adjust the printing guides. That being said, if your printer supports non-standard sizes, here are basic steps to get started.
- Slide the paper guide on your printer feed to the 4 inch wide position. Or, look for a paper tray designed just for 4″ x 6″ sheets.
- Load in the 4″ x 6″ sheets and check that they fit snugly in the paper feed.
- Open your project and click, “Print.”
- Check that your printer is set to 4″ x 6″ paper size. It may be under “Properties,” “Preferences,” or “Advanced settings.”
- Set the paper type to “labels,” “cardstock,” “heavy weight,” or “specialty” as usual.
How to cut out planner stickers
If you want to kiss cut a sheet of DIY planner stickers you will need a craft cutting machine. A kiss cut is when the top layer of the sheet is cut, but the backing is not, so that you have a sheet where individual stickers can be peeled away. However, you can also cut out individual planner stickers with scissors or trim sticker sheets with a paper cutter.
Let’s start with the easy stuff. If you want to print DIY planner stickers on a regular 8-1/2″ x 11″ sheet of smaller labels , you generally won’t need to cut them. They already come kiss cut, however, you may want to trim the sheet and cut it in half after printing so that your sticker sheets fit in planner pockets. A simple paper cutter will handle that in snap. Likewise, cutting out custom-shaped stickers that were printed on a full sheet label is easy to do with scissors.
Can you make planner stickers with a Cricut?
The short answer is yes. However, it’s important to know that the design software is not free. It’s subscription based with a monthly fee and there is definitely a learning curve. Folks new to Cricut may find it difficult to actually use. However, with a little guidance you can use Cricut three different ways to kiss cut stickers.
Enjoy making your own DIY planner stickers
There are so many reasons to love using stickers in your planner. You can use them for appointments and reminders, day/date covers, and much more. For example, decorating and personalizing your planner. Luckily, free designs and Avery Design and Print Online software make it easy for you to start making DIY planner stickers right from your desktop.
Did you know that Avery has super cute preprinted planner stickers too? Not to mention our other awesome planner accessories. What’s your favorite part about planning? Tag us on Instagram to show off your beautiful planners.
