

5 Fresh Ideas for Organizing Gardening Supplies
Expert tips for organizing and labeling outdoors
Spring has sprung, and that means we all want more time in the garden. Spend more time cultivating and less time combating clutter. Specifically with tips that make it easy to organize your gardening supplies (and keep them that way).
We’ve got new organizing tips, updates that improve on classics, and how to make sure your labels last outdoors. Above all, we’ll show you how to add your own personal style to all of your garden organization projects.
More resources you might like for organizing at home:
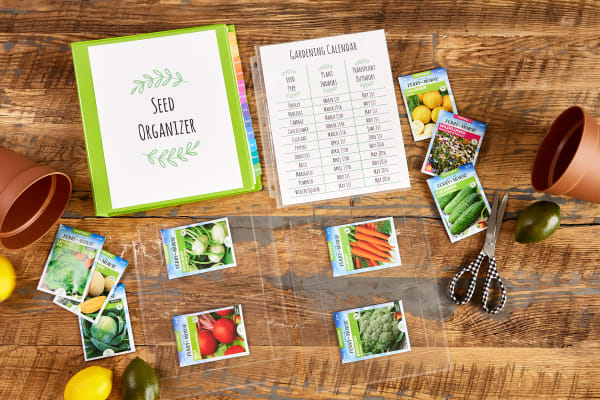
1) Next-level hack: how to organize your seed packets
Seed packets are one of the most difficult things to organize. It’s so easy to fall into the seed-drawer or seed-box trap. That is to say, accumulating tons of tiny packets because you can’t see what you already have. Not to mention the mess if the packets get spilled.
Sheet protectors originally designed for photos, trading cards, and business cards have tiny pockets. For this reason, they’re a genius way to get all your garden seeds in one accessible place.
All the packets are easy to see so you can avoid buying repeat varieties. You can also add dividers or use tabs to organize by planting season or type of plant.
Additionally, your seed binder is also the perfect place to keep a gardening calendar with planting dates. Put it in a sheet protector or just slip it in the binder cover and you’re good to go.
If you’re feeling extra ambitious you can turn your seed binder into a garden journal by adding extra pages at the back for garden planning and making daily entries.

2) Update your aesthetic with simple and cute garden markers
Channel your inner artist for a fun afternoon project that’s creative and relaxing but not too involved. Use simple paint stir sticks and permanent markers to create your own unique garden markers.
You can usually find paint stir sticks for free at your local hardware store. Jumbo wooden craft sticks also work. Ultra-fine permanent markers are awesome for drawing delicate finishing details.
3) Upgrade to waterproof labels for organizing garden supplies
Working outdoors can be messy and paper labels are not designed for standing up to water, dirt, and other outdoor elements. Instead, use waterproof film labels to organize gardening supplies.
Avery film labels come in several different varieties, but the best for gardening are waterproof rather than water-resistant.
Our waterproof labels are also resistant to oils and common household chemicals. In other words, you can take containers out in the sunny damp garden, get messy and wipe them down afterward, no problem.
Avery waterproof labels by the sheet come in over 100 shapes and sizes, so we created this “cheat sheet” of quick links to help you find the best ones for your project.
Best waterproof Avery labels for outdoor projects
| Common Use | Avery Product |
|---|---|
| Large bins/cans Composting Fertilizer | 4″ x 3-1/3″, 40 ct. (64505) By the sheet (94223) |
| Medium-sized bins Large garden tools | 2″ x 3-3/4″, 80 ct. (64504) By the sheet (94240) |
| Small bins Pegboard storage ID labels Small tools | 1″ x 2-5/8″, 160 ct. (64501) By the sheet (94200) |
| Spray bottles Mason jars | 3-1/2″ x 5″, 200 ct. (60503) By the sheet (94256) |
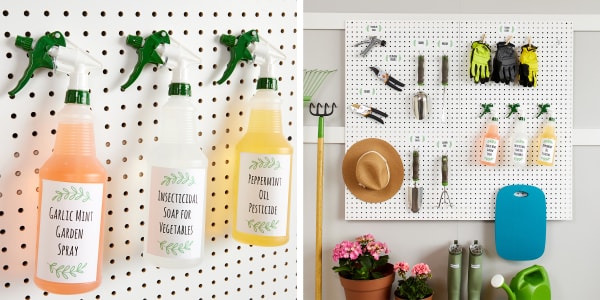
4) How to label and organize your DIY insecticides and sprays
Our favorite way to store spray bottles for the garden is on pegboard hooks or hanging on a simple towel rack. Both options are super easy to install and can keep your DIY garden sprays safely out of reach of pets and kids.
Furthermore, it’s always a good idea to label homemade insecticides and garden sprays so they don’t get sprayed somewhere they shouldn’t. A label on the back is ideal for noting the ingredients and concentration as well as handy information in case of an accident.
Industrial labels designed for labeling chemical containers are actually the perfect label for using on DIY garden spray bottles. Especially to avoid bottles of “mystery chemicals.” The labels are engineered to last in extreme marine environments, so basically anything your garden can throw at them, they can take.
Our GHS and chemical safety labels are engineered to be waterproof (certified to last 90 days submerged in seawater!), and resist scratches, tearing, UV rays, and chemicals (such as oils). They can easily stand up to garden sprays with essential oils and other natural chemical substances like vinegar and Castile soap.
Pro tip: If you want to make sure the ink doesn’t smudge or smear on your waterproof labels, always make sure you’re using the right kind of label for your printer.
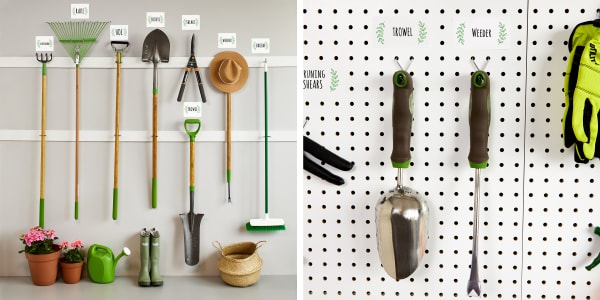
5) Make use of vertical space for gardening tools and equipment
Pegboard and spring-grip wall mounts are perfect for maximizing garden storage by using vertical space. We’ll walk you through how to organize tools of various shapes and sizes while keeping like items together and making sure there’s room for everything.
First, take inventory of everything you have and make a list. Use your list to create make labels for each item. Our printable waterproof labels are not only going to hold up well in the garage or garden shed, but you can personalize them too.
Design your own gardening labels with our free Avery Design and Print Online (ADPO) software. You can choose from tons of flower and plant images to add to labels using the Avery Gallery.
Learn how to add images to any project in Avery Design and Print Online with written instructions, or our helpful YouTube video with expert tips.
Next, sort everything by size into two groups: large tools and small tools. Wall-mount storage is best for large tools, for example, hoes, shovels, and rakes. Pegboard is best for small items like trowels, weeders, and gloves.
Then, experiment with the layout by laying the items out on the floor. This will give you a good idea of where to put your wall mounts and pegboard hooks.
Finally, when you have everything puzzled together for the most efficient layout, install your mounts and hooks. Finish by labeling where each item belongs so that it’s easy to keep organized.
Get organized and spend more time in the garden
They say home organization is a practice, not a project… but that’s only true to an extent. You have to have a good system in place so that it’s easy to put items away and you don’t have to waste time constantly reorganizing.
Getting your gardening supplies organized is no different. Whether it’s storing your seed packets so they’re easy to see or making sure your gardening labels last.
Enjoying the look of your freshly organized garden supplies doesn’t hurt either. Loving the aesthetic of your space is a powerful motivator to keep it organized.
How are you getting organized in the garden? Connect with us on Instagram to share your favorite gardening tips and aesthetics.
Meanwhile, shop organization supplies for home and office for all your projects.

