9 steps to organizing your Christmas décor for less hassle next year
Figuring out how to organize your Christmas decorations can be a bit overwhelming after enjoying a season full of merriment. However, with a little planning and some smart organization tips, you can make the process smoother and more enjoyable. Moreover, you can even set yourself up for less hassle when putting up decorations next year. In this blog post, we’ll explore some of the best tips for how to organize your Christmas decorations.
More articles you might like:
- Free Christmas Planner Stickers and How to Print Them
- How to Declutter Your Home Right Now in 4 Easy Steps
- 10 Tips for Making the Best Christmas Card Labels
Why you should organize your Christmas decorations
Of course, it can be very tempting to shove all of your Christmas stuff into any boxes or bags you can find. Although this might seem like a good idea, it really isn’t. In fact, there are three very good reasons to organize Christmas decorations before you put them away.
First and foremost, when you toss decorations into containers without regard, you’re more likely to damage them. On the other hand, sorting and storing your items neatly helps them last longer, so you don’t have to waste money on new ones. Secondly, taking the time to organize your Christmas decorations now will save you headaches later. No one wants to spend all their decorating time untangling garlands and string lights.
Lastly, organizing and packing your Christmas decorations neatly will cut down on the space needed to store them. Remember that seasonal storage sits in your garage, closet, or shed year-round. Wouldn’t it be nice to have some extra space?
1) Sort your Christmas decorations
Start by organizing Christmas decorations by sorting them according to type, matching like items with like items. For example, ornaments with ornaments, string lights all together, soft furnishings, and so on. Then sort them by “broken” and “do not want.” The “do not want” pile is easy—simply donate these items so that others can enjoy them and you can reclaim some storage space. Finally, you will have to sort the broken items into things you can (and will) fix versus those beyond repair. If you can’t (or will never) repair something, just toss it and be done.
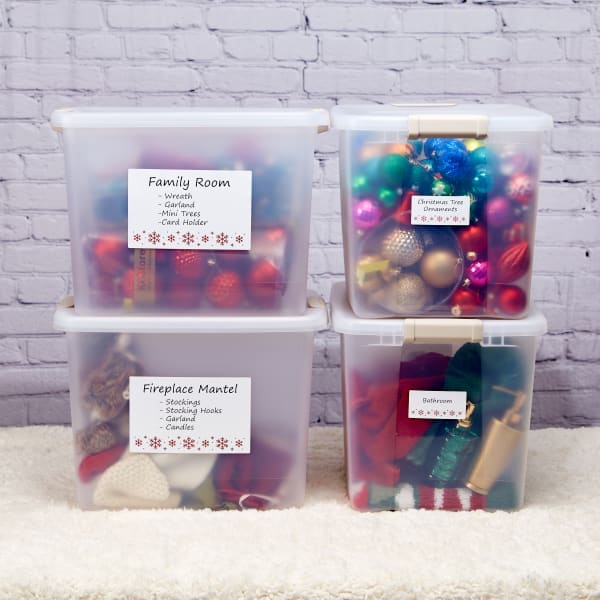
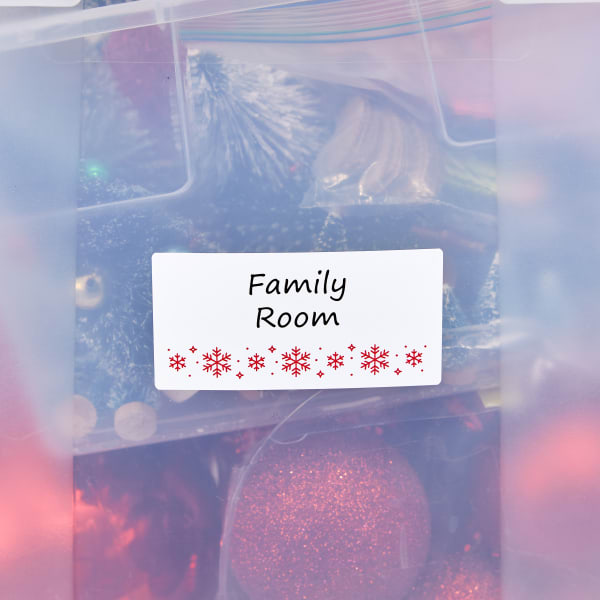
2) Categorize Christmas décor by room
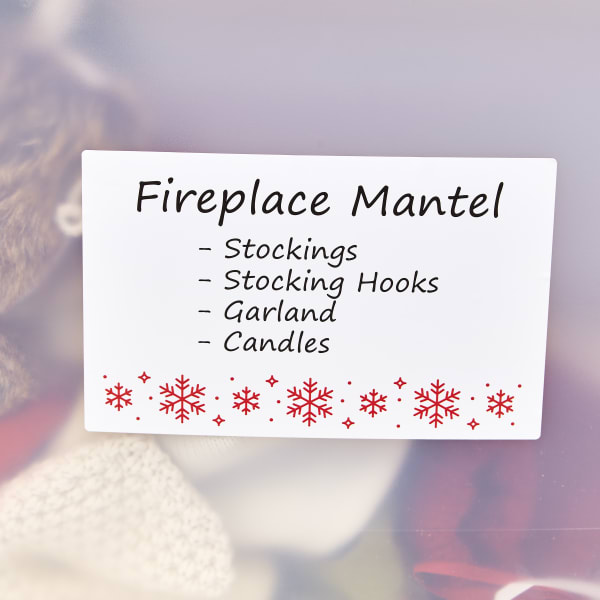
Next, group items by location. For instance, the living room, mantle, family room, front porch, and the like are all good starting points. This is key to making next year’s setup run smoothly. It can be tempting to pull everything out of storage at once; however, that is a recipe for clutter! Instead, pull out the containers for one area at a time so that you still have calm spaces to retreat to while decorating. Organizing Christmas decorations by room also works out great because when you find a setup you really like, you can take a picture and add it to the container. Next year, it will not only be easier to know what goes where but easier to delegate tasks to helpers as well.
3) Gather decoration storage supplies
When choosing storage supplies for organizing Christmas decorations, you should consider durability, organization, and preservation. For example, sturdy, stackable plastic bins with secure closures protect delicate ornaments from dust and damage. They also keep out pests like bugs and rodents. Additionally, adjustable dividers within the containers provide flexibility for various ornament sizes, while specialized ornament trays or compartments keep them snugly in place.
While cord organizers and cable reels are one way to keep Christmas lights tangle-free, you can also round up extra cardboard for a cheap DIY alternative. Likewise, there are plenty of wreath storage containers for organizing Christmas decorations out there, but garment bags can work just as well. Finally, make sure you have a labeling system that ensures effortless identification, turning the process of decorating into a joyful and hassle-free experience year after year.
4) Use clear bins to store Christmas decorations
Clear bins are clearly the top choice for storing and organizing Christmas decorations (no pun intended). The reason they’re practically unmatched in terms of organizing Christmas décor is because you can always see what’s inside. The transparent exterior allows you to effortlessly identify the contents of bins without rummaging through multiple containers. This transparency is a game-changer during the holiday season, making it a breeze to locate specific ornaments, lights, or decorations, thus saving valuable time and reducing frustration. And of course, as mentioned above, clear bins offer more protection than cardboard boxes by shielding the decorations from not just dust but moisture and pests as well.
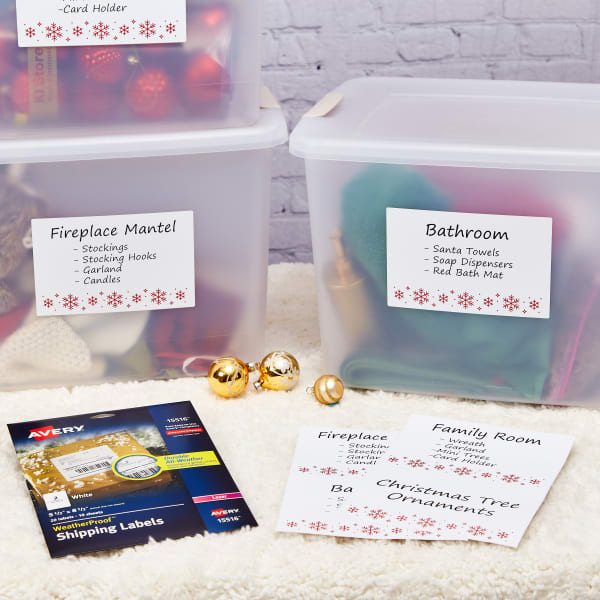
5) Choose the right labels for your containers
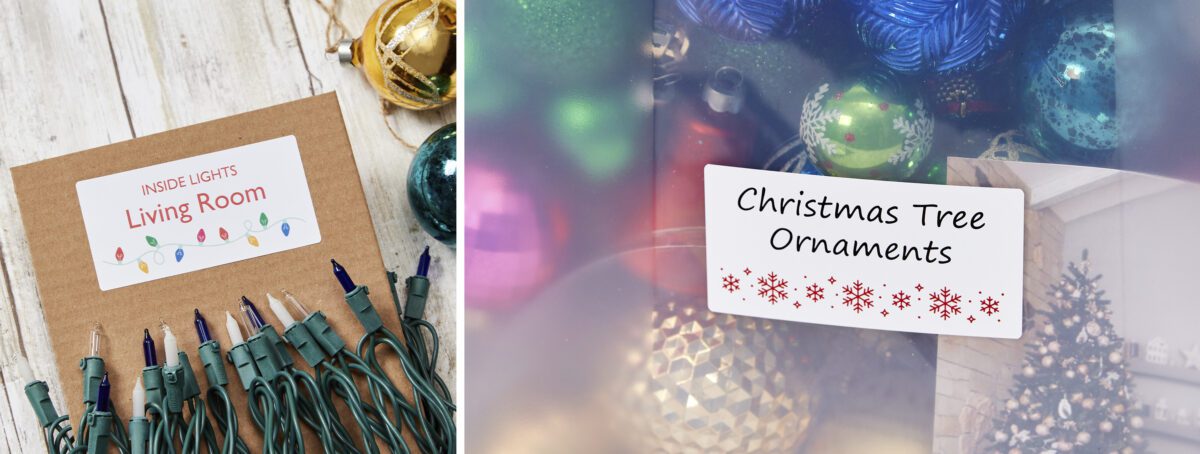
Selecting the right labels for storage containers is a pivotal step in creating an efficient system for organizing Christmas decorations. Let’s start with the basics: label material and adhesive. You will want labels that are durable enough to resist wear and tear and stay stuck on your storage containers. For these reasons, we recommend durable film labels with UltraHold® adhesive (which will stay on permanently) or removable labels that stay stuck on but are removed without leaving residue.
In particular, these 2″ x 4″ waterproof labels (Avery 15513) are perfect for labeling Christmas storage because they will stay on and intact, even if they get damp out in the garage or shed. For more flexible labeling, we recommend these 2″ x 4″ removable neon labels (Avery 6481). Not only do they allow you to easily switch up your storage labels, but you can also color-code your Christmas decorations. Ultimately, the right labels streamline the organization process and make it easier to keep your storage space neat and tidy.
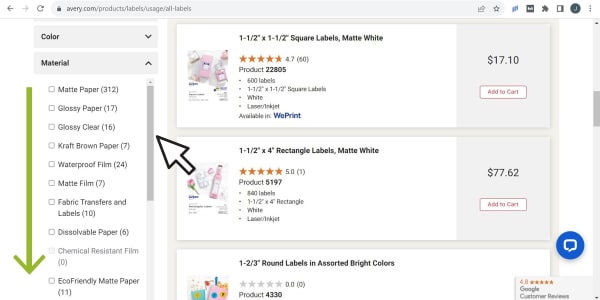
We recommend 2″ x 4″ labels for organizing Christmas decorations because it’s a fairly versatile size for a variety of storage containers. However, if you’re looking for a wider variety of sizes and shapes, buying blank labels by the sheet gives you the most options; you can even choose custom sizes. Here are some quick links to explore custom sizes and more shapes for your Christmas storage labels.
6) Label Christmas decoration containers
Once you’ve chosen the labels that work for your Christmas decoration storage, it’s time to fill them in. Of course, you can fill in any label by hand using permanent markers, like the ones we offer in black as well as a range of colors. However, did you know that you can design custom labels online for free? Avery Design and Print Online is free online software that stores your designs in the cloud and comes with all the standard design tools you need. We even have free design templates you can customize and make your own. Whether you want simple text or something a little more festive, designing your own labels for organizing Christmas decorations can be done in minutes.
Want to design labels offline? You can download blank Avery label templates for Word, Pages, and Adobe editing software. We even have helpful articles to help you print Avery products from different software, for example, this one that walks you through printing from Apple Pages.
When you’re done designing your labels, you can print them yourself on blank labels designed to work with your home printer (read this if you want to know why that’s important). Or, you can order them custom-printed using our Avery WePrint® service. Custom printing is a great option if you’re printing a large quantity of labels or don’t have a printer at home.
Free templates for organizing Christmas decorations
Print this design using a laser printer and 2″ x 4″ waterproof labels sold by the package (15513). Or, print on the same labels sold by the sheet (92407) and use them with either laser or inkjet printers.
To order custom-printed labels, simply choose “Let Us Print For You” after you’re finished customizing.
Print this design using a laser printer and 5-1/2″ x 8-1/2″ waterproof labels sold by the package (15516). Or, print on the same labels sold by the sheet (94229) and use them with either laser or inkjet printers.
To order custom-printed labels, simply choose “Let Us Print For You” after you’re finished customizing.
7) Protect fragile Christmas decorations
When organizing your Christmas decorations, it’s important to think about how to protect fragile decorations, such as ornaments. Start by using one or more dedicated storage containers. Whether you go with store-bought ornament containers or make your own is up to you. In general, you can find a good offering of dedicated ornament containers at your local big box store or online. The main benefit of ready-made ornament storage containers is that they come with individual compartments to keep each ornament safe. However, if you don’t have an ornament container, you can totally make one yourself. First, gather items from around the house to upcycle, like egg cartons, plastic cups, cardboard, or foam crafting sheets. Then use these items and a hot glue gun to create separation within your larger storage container.
After you’ve figured out the best storage containers to organize your Christmas decorations, it’s time to start packing. First, wrap each ornament with an extra layer of protection to help prevent scratching and breakage. Then place each one into its own compartment. Some great household items to consider for wrapping are: tissue paper, wrapping paper, newspaper, old clothes or rags, and bubble wrap from old packages.
Hot Tip: Save the wrapping paper and tissue paper from Christmas gifts for wrapping ornaments later. It cuts down on waste and protects your ornaments!
Finally, store your fragile Christmas decorations away from direct sunlight in a cool, dry place. This will help prevent damage from extreme heat or cold as well as moisture, so that your family will be able to enjoy them for generations.


8) Pay special attention to Christmas lights
Christmas lights can be a major pain to deal with if you don’t properly store and organize them. Doing it right the first time is critical for three very good reasons. Firstly, and perhaps most obvious, organizing your Christmas lights prevents tangles and makes it easier to set them up next year, saving you time and frustration. Secondly, it saves you money. When you just shove a tangle of lights in a box, the delicate wires and bulbs are more likely to get damaged, and then you have to replace them. Lastly, and most significantly, damaged lights can actually be a fire hazard. It’s important to remember that they are electric decorations, after all, and as such, they should be stored carefully to prevent damage that can cause a safety issue.
How to organize Christmas lights
The best way to organize Christmas lights is to neatly wrap them around a piece of cardboard or cord wheel, label them, and then place them in a weatherproof container. Not only will this make decorating next year less of a hassle, but it will also help prevent cracking, fraying, and loose wires, which can all cause a shock or start a fire, according to the Electrical Safety Foundation. A weatherproof container also helps keep away moisture, which should never be mixed with indoor electrical decorations.
Free templates for labeling Christmas lights
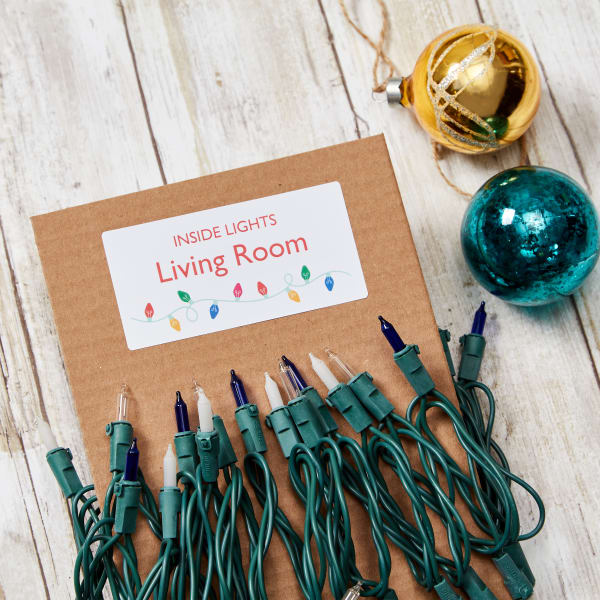
Print this design using a laser printer and 2″ x 4″ waterproof labels sold by the package (15513). Or, print on the same labels sold by the sheet (92407) and use them with either laser or inkjet printers.
To order custom-printed labels, simply choose “Let Us Print For You” after you’re finished customizing.
Where should you store Christmas lights?
In addition to neatly wrapping Christmas lights, choosing the right location to store them can make all the difference. The absolute best place to store them is an indoor closet, if you have the space. Why? Because you probably keep your home temperature relatively controlled and the inside is dry. However, as long as you don’t live in an extremely hot or cold place, the garage is generally fine as long as you use plastic containers for protection from moisture and critters. Rodents can easily chew through Christmas light wires, creating a potential safety hazard.
9) Choose a spot to safely store your Christmas decorations
As mentioned above in regards to Christmas lights, storing Christmas decorations indoors is always going to be the safest place. This is because your home is probably not going to experience extreme temperature fluctuations and is not likely to have moisture or rodent problems. That being said, not everyone has extra closet space for organizing Christmas decorations. Here’s what you can do to safely store your seasonal décor.
- Maximize what you can fit inside by utilizing vertical space when you can.
- Prioritize keeping electrical Christmas decorations and fragile items inside.
- Anything kept in the garage or shed needs to be in a sealed plastic bin.
- Store Christmas decoration bins off the floor to avoid minor leaks and flooding.
Organize your Christmas décor for less hassle
We hope our tips for how to effectively organize your Christmas decorations help you create a smoother and less stressful experience next year. Simply put, proper organization helps prevent damage to decorations, saving you time, money, and space. Here’s a condensed summary of our best tips:
- Sort decorations by type and room.
- Choose durable storage supplies.
- Use clear bins for easy identification.
- Label containers with appropriate materials.
- Protect fragile items like ornaments.
- Pay special attention to Christmas lights to prevent tangles and fire hazards.
- Store Christmas items in a safe, controlled environment for the safety and longevity of your decorations.
With these practical tips, you can enjoy a hassle-free decorating experience. For more home organization tips and tricks, follow us on Instagram and check out our Pinterest board for getting organized.