

How to Make Bakery Labels: A Complete Guide
Create irresistible labels that showcase your baked goods and highlight your brand
When it comes to baked goods, presentation is just as important as taste. A well-designed bakery label doesn’t just inform—it creates an experience, reflects your brand’s personality, and makes your treats irresistible to customers. From fresh bread to cupcake boxes, the right label can be the finishing touch that sets your bakery apart.
Whether you’re running a busy storefront or packaging homemade treats for markets and events, your labels need to balance practicality with charm. Here’s your step-by-step guide to creating bakery labels that inform, delight, and elevate your baked goods.
1. Define your brand identity
Before designing your labels, clarify your bakery’s personality. Are you cozy and rustic with warm, earthy tones? Sleek and modern with bold pops of color? Your brand identity should guide every design choice, from fonts to colors. Consistency across your labels builds recognition and trust with your customers.
2. Gather essential information
A bakery label isn’t just decoration, it’s a communication tool. Include the essentials to keep your customers informed and confident:
Company info: Add your website, social handles, or physical address for easy contact.
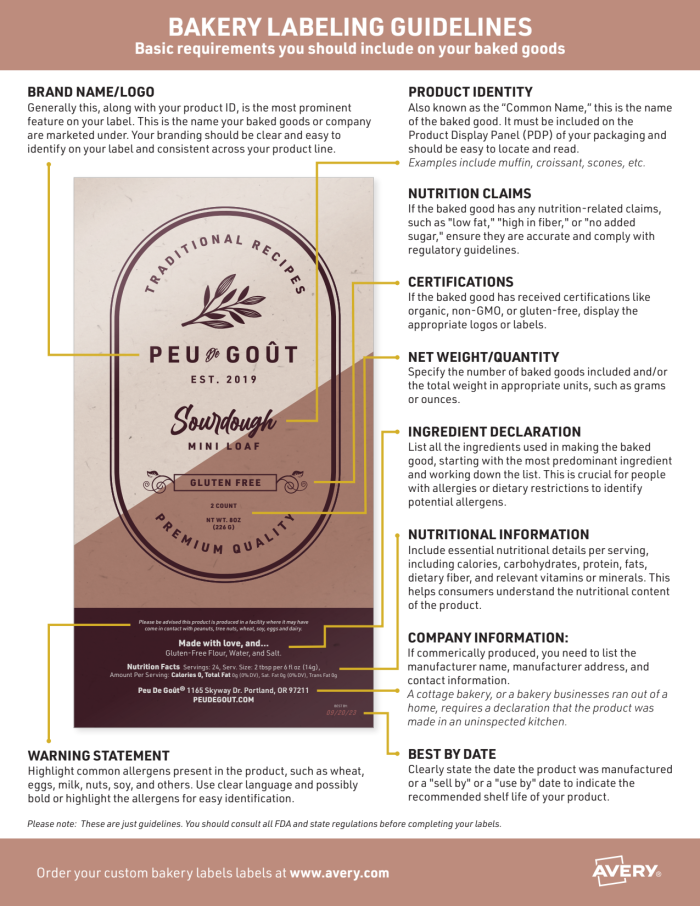
Brand name: Make sure your bakery name is front and center.
Product name: Clearly identify each baked good, like “Blueberry Muffin” or “Chocolate Chip Cookie.”
Ingredients: List all ingredients for allergy awareness and transparency.
Nutritional information: If possible, include calories, fat content, and other relevant info.
Certifications: Highlight certifications like gluten-free, non-GMO, or organic.
Allergen info: Call out common allergens like nuts, gluten, or dairy.
Date & price: Include production/expiration dates and pricing.
3. Choose your design elements

Your label should be both eye-catching and true to your brand:
Images & graphics: Include high-quality images or illustrations of your baked goods to entice customers.
Color palette: Pick colors that evoke the feeling you want customers to associate with your treats.
Typography: Use readable fonts that match your brand personality. Mixing heading and body fonts creates visual hierarchy.
4. Use free design tools and templates
You don’t need to be a professional designer to make great labels. Tools like Avery Design & Print, Canva, Photoshop, or Illustrator can help you start. Avery offers free label templates, and our 5 Best Product Label Software Programs guide can help you explore other options.
5. Plan your layout
A clear, organized layout ensures your labels are easy to read.
Size & shape: Match your label size to your packaging. Avery’s custom sizes and shapes add flexibility.
Hierarchy: Highlight the product name first, then essential details like ingredients and certifications.
Whitespace: Avoid overcrowding; leave room around text and images.
6. Keep your branding consistent
Consistency is key to building recognition.
Colors & imagery: Combine your colors and visuals to create an appealing, harmonious design.
Typography: Stick with the same fonts across all labels.
Logo placement: Make sure your logo is visible for instant brand recognition.
7. Review and proof
Check your labels carefully before printing. Typos or missing information can confuse customers. Have someone else review your labels—they often catch mistakes you might overlook.

8. Print and apply
Bring your labels to life.
Printing options: Print in-house or use professional services like Avery WePrint for polished results.
Application: Apply labels evenly for a clean, professional look.
Material selection: Choose materials that fit your needs—waterproof for refrigerated goods or classic finishes for artisan treats.
Ready to make your labels?
Bakery labels are more than just information, they’re a way to tell your story and make your baked goods irresistible. Follow these steps, and your labels will help your treats stand out, boost sales, and strengthen your brand.
Need help designing or ordering labels? Avery Customer Care is ready to assist at (800) 462-8379. Happy baking!

