

How to Make Ingredient Labels
A step-by-step guide to creating clear and compliant ingredient labels
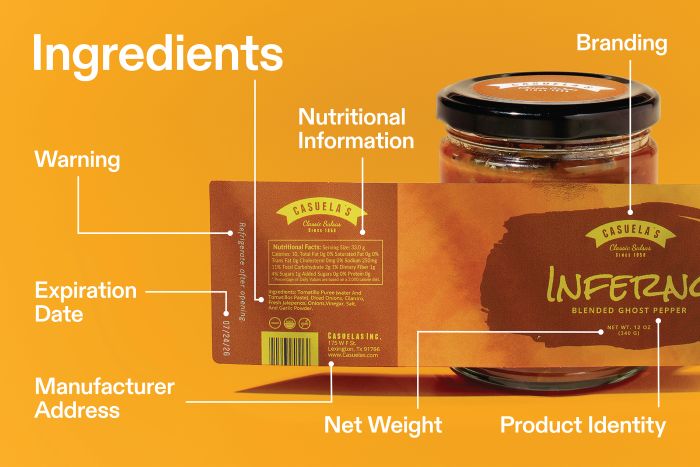
Accurate ingredient labels aren’t just a regulatory must, they’re a way to build trust with your customers. Whether you’re a small-batch maker or running a full-scale food business, clear labeling shows transparency, helps people make safe choices, and elevates your product’s professionalism. Here’s how to create ingredient labels that are compliant, informative, and easy to read using ReciPal and Avery labels.
Step 1: Know the rules
Why it matters: Compliance protects your business and your customers.
Quick checklist:
- List all ingredients
- Highlight allergens
- Include nutrition facts
- Add manufacturer/distributor contact info
Regulations vary by country. For instance, the FDA in the U.S. requires allergens like peanuts or milk to be clearly labeled, while other countries may have additional rules for nutrition panel formatting. Reviewing regulations before you start ensures you won’t have to redo your labels later. Official labeling guides, webinars, or online courses from food safety authorities can be a great resource as they often include sample labels and highlight common mistakes.
Step 2: Gather your ingredient info

Why it matters: Accurate ingredient information ensures consumer safety and trust.
Quick steps:
- List every ingredient with exact amounts
- Note any allergens (nuts, dairy, gluten, etc.)
- Track nutritional details: calories, serving size, macronutrients
It’s also helpful to keep batch-by-batch records. Even small changes in suppliers or ingredient quality can affect nutrition data. Include descriptive details like organic cane sugar or unsalted butter rather than just “sugar” or “butter.” Transparency in labeling shows professionalism and builds credibility with your customers.
Step 3: Use ReciPal for nutrition analysis
Why it matters: Fast, accurate labels that meet regulatory standards.
How it helps:
- Automatically generates nutrition facts
- Creates professional ingredient lists
- Lets you experiment with recipe variations
ReciPal isn’t just about labels—it’s also a tool for testing and refining recipes. Want to reduce sugar or boost fiber? ReciPal recalculates nutrition info instantly, so you can see how changes affect your label. It’s especially useful if you’re producing multiple variations of a product, like seasonal flavors or different portion sizes.
Step 4: Pick the right label material
Why it matters: Durable, readable labels protect your product and brand.
Options:
- Multiple sizes and shapes, including custom options
- Upload ReciPal label into Avery templates or start from scratch
- Choose finishes suitable for your product environment
Consider where your product will be stored and handled. Refrigerated items might need waterproof labels, while matte finishes reduce glare for easier reading. Glossy finishes can enhance colors and give a more premium feel. Picking the right material ensures your label lasts through shipping, storage, and daily handling while keeping your product looking professional.
Step 5: Make it readable and appealing
Why it matters: Good design improves both safety and shelf appeal.
Design tips:
- Use legible fonts and clear headings
- Highlight allergens with contrasting colors
- Include icons, certifications, or awards
Visual hierarchy matters: bold key headings like “Allergens” or “Nutrition Facts” and leave enough white space around text blocks to prevent clutter. Icons or symbols can simplify complex info, such as a peanut icon for allergen alerts. Testing readability by printing a sample or asking someone unfamiliar with the product to review it can help catch confusing sections before you print the final batch.
Step 6: Double-check everything
Why it matters: Errors can lead to fines, recalls, or lost consumer trust.
Checklist:
- Proofread ingredient lists, nutrition facts, and allergen information
- Verify layout, spelling, and formatting
- Test readability in different lighting and viewing distances
Even if everything looks perfect on screen, mistakes can sneak in. Printing a sample helps catch alignment, font size, or color contrast issues. A second reviewer often spots errors you missed. Accuracy in labeling protects your business and shows customers that you care about details.
Step 7: Print your labels

Why it matters: The final step makes your product ready for customers.
Options:
- DIY printing: Print at home with Avery blank labels (sheets or retail packs)
- Professional printing: Use Avery custom printing for polished, ready-to-ship labels
Test a small batch first to ensure your colors, alignment, and materials look as expected. DIY printing works well for small batches or seasonal products, while professional printing is ideal for larger runs. Need help? Avery’s customer care team is available at (800) 462-8379 to guide you through any step of the labeling process.
Other articles you might like:
Bottom line
Creating ingredient labels is essential for every food product. By combining ReciPal’s nutrition analysis tools with Avery’s versatile labeling solutions, you can produce accurate, compliant, and visually appealing labels that customers can trust. Follow these steps, and your product packaging will be professional, safe, and consumer-friendly.

