How to make a name tags
The best way to make name tags is to create the designs online for free and then print them yourself or have them printed for you. The most seamless way to do this is to use Avery Design and Print Online (ADPO), which is free, cloud-based software. Then pick a design to easily modify or upload your complete design, and finish by printing or ordering custom-printed name tags. From start to finish, there are just 5 steps to making name tags:
- Go to the ADPO homepage and click “Start Designing”
- Enter your Avery product number
- Choose a name tag template
- Personalize your name tag
- Save, download, and print
Below, we’ll break down each of these steps in detail, as well as show you how to make a name badge using Microsoft Word. Our instructions include pictures as well as helpful videos, so be sure to bookmark this article for easy reference.
1) Go to the Avery template finder page
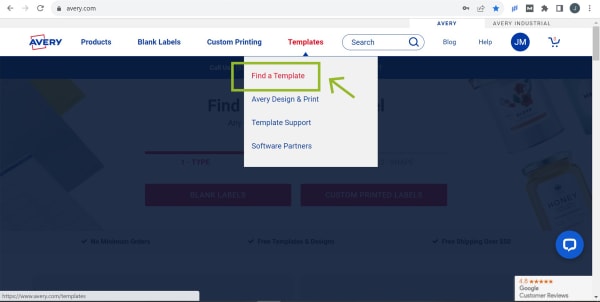
Go to the Avery template finder page and select “Find a Template” from the dropdown.
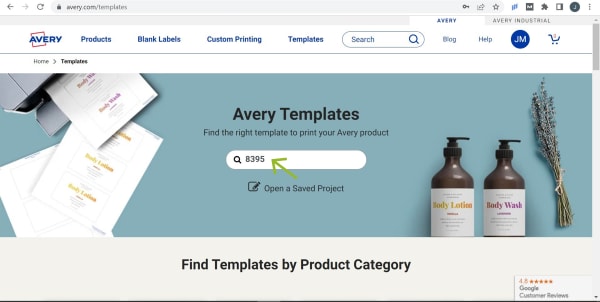
Enter the Avery product number for the name tags you want to use.
The Avery product number is a unique identifier for each type of name badge or name badge material that Avery sells. Because it is so important, the Avery product number is generally located at the top right of the front of the package of name tags you’ve purchased. The product number is also listed on each product’s page. However, if you are not sure which product number you need, you can compare different types of name badges and name tag materials on the Avery website.
Once you have the Avery product number, you can enter it into our ADPO software to create your name badges. ADPO will use the Avery product number to show you blank and predesigned templates that are designed for the correct size, shape, and other settings for your name badges.
Best material for name tags
The best materials for name tags are ones that are easy to print or write on and easy to wear. Examples include paper or film labels that stick to fabric, durable plastic name tags, or cardstock that goes in a plastic or metal name tag holder. Ideally, these materials would be printable and okay to write on with a permanent marker.
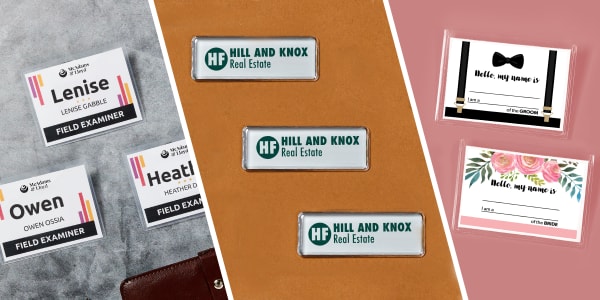
When it comes to Avery name badges, all of our materials are easy to print or write on and easy to wear. A prime example is our popular name tag stickers, which are printable, can be written on with permanent marker, and stick to fabric without leaving residue behind. Another great example is The Mighty Badge® system. To make a Mighty Badge, you print or write on clear inserts, then assemble the metal name badge that attaches to clothing with magnets. Below is a helpful table of Avery name badge materials for comparison.
| Product | Material | Attachment | Customize |
|---|---|---|---|
| Adhesive name badges | Paper or Film | Fabric-safe adhesive | Laser printer Inkjet printer Ballpoint pen Permanent marker |
| Clip-style badges | Cardstock Plastic | Plastic holder with a clip on the back | Laser printer Inkjet printer Ballpoint pen Permanent marker |
| Pin-style badges | Cardstock Plastic | Plastic holder with a pin on the back | Laser printer Inkjet printer Ballpoint pen Permanent marker |
| Magnetic badges | Cardstock Plastic | Plastic holder with magnets on the back | Laser printer Inkjet printer Ballpoint pen Permanent marker |
| The Mighty Badge | Metal Plastic | Metal holder with magnets on the back | Laser printer Inkjet printer Permanent marker |
| Hanging badges | Cardstock Plastic | Plastic holder with cords | Laser printer Inkjet printer Ballpoint pen Permanent marker |
| Durable ID badges | Durable 11mil plastic | Hole for clip or lanyard | Laser printer Ballpoint pen Permanent marker |
What is the average name tag size?
The average name tag is about the size of a credit card or slightly bigger. However, size can vary by type of name tag. For example, the most popular type of name tags are the “Hello, My Name Is” stickers that stick right on your shirt, such as the Avery 5141. Adhesive name tags like this are generally 2-3/16″ x 3-3/8″. Printable cards that go inside name tag holders (on lanyards, pins, clips, etc.) can be either about 2-1/4″ x 3-1/2″ or slightly bigger, around 3″ x 4″. In contrast, employee name tags might be quite a bit smaller, around 1″ tall by 3″ wide.
2) Click “Start Designing” on the template page
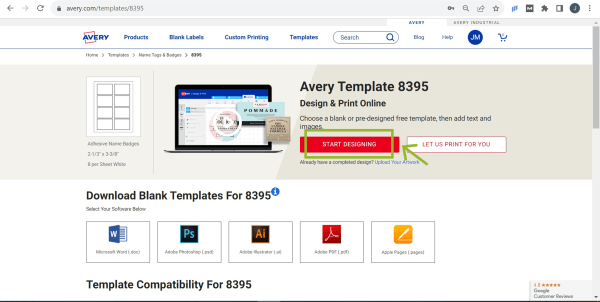
On the template page, click the big, red “Start Designing” button to open ADPO.
Since ADPO is free cloud-based label-making software, you can create and print name badges without having to download anything. However, you will need to be signed in to your free Avery account in order to save and print your name badges, so it may ask you to sign in before opening.
3) Choose a name badge template
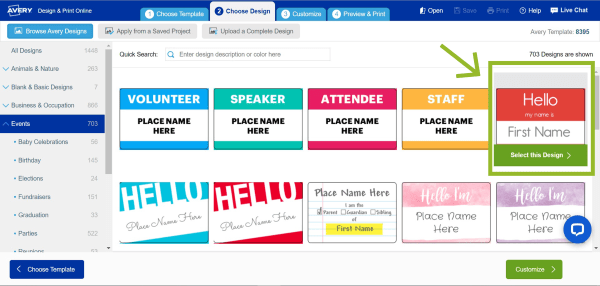
Use the left menu to browse by category, then click the template you want to use.
When you open ADPO from the product template page, you will see blank templates and predesigned templates that you can modify. Choose a blank template to design from scratch using standard design tools in ADPO. Or, choose a predesigned template and customize it by editing the text, font, images, colors, and more. This video gives you a quick walk-through of using ADPO to customize Avery products, so you can get the idea.
Most popular name tag templates
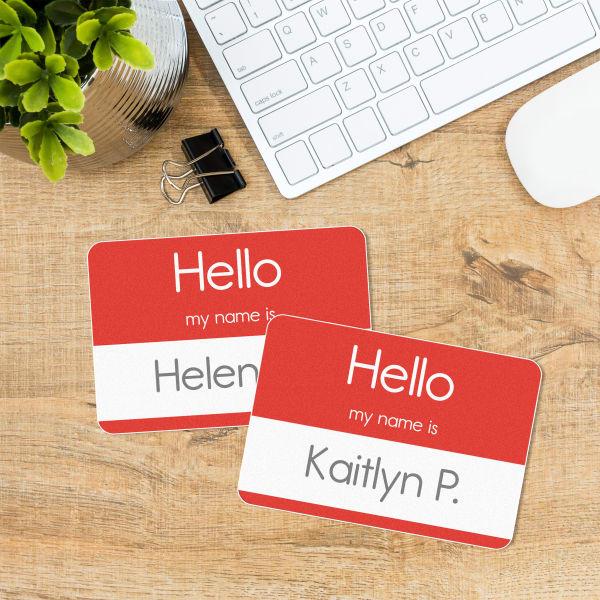
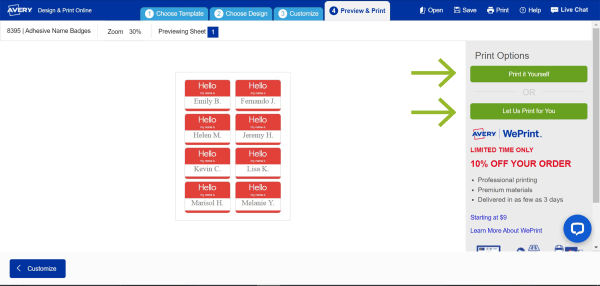
Print this design on Avery 8395 adhesive name tags using a laser or inkjet printer.
Or, choose “Let Us Print for You” after customizing to order custom-printed adhesive name tags.
“Hello, My Name Is” stickers are some of the most iconic name badges ever created. They’re instantly recognizable, and everyone understands how to use them at first glance, so when in doubt, they’re a great choice for any event. You can even change the colors and font on the template above to match your event’s theme. If you want something more specific, there are hundreds of free name badge templates to choose from in ADPO, or check out our roundup of 21 awesome name tag ideas to elevate any event. The article includes tons of free, customizable templates for weddings, parties, work functions, and school events.
4) Personalize your name badges
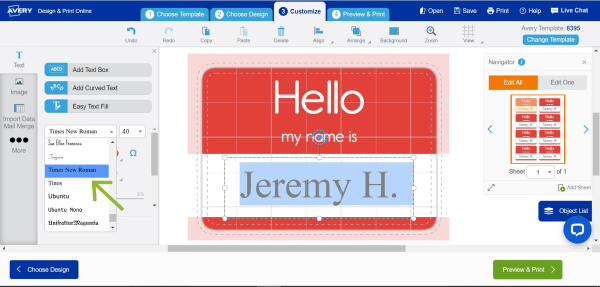
Click the text box to type new text. Once the text box is selected, you can also make other changes to the font, color, and/or size using the menu on the left.
Once you’ve chosen a template to customize, the editing tools are located in a menu on the left-hand side. Clicking any tool will expand the menu to include a variety of more specific tools. For example, if you click the Text tool, the menu will expand to offer you choices for font, color, size, and other text-specific tools. Using the left-hand menu, you can also edit shapes, colors, and the background, as well as add elements like images, QR codes, or sequential numbers.
Make changes to your overall design first
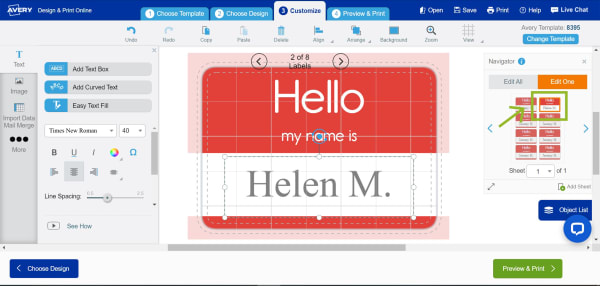
Edit All changes all the name tags. This is best for making changes to your overall design (like font size, style, etc.).
Edit One makes changes to just the name tag you have selected. It’s best to switch to this for manually typing in names.
The Edit One/Edit All feature in ADPO allows you to choose between making changes to all your name tags at once or making changes to just one name tag. This is crucial for any project that has individual names, such as name badges. Another good reason to get familiar with Edit One/Edit All is for making your own personalized gift tags.
As noted above, Edit All is great for making changes to your overall design, such as the font size, style, background color, etc., and it’s best to make those changes first. Then, once you have the overall design the way you want it, you can switch to Edit One to manually type in individual names. But if you plan on using Mail Merge to add names (as will be explained below), simply stay in Edit All mode.
Quickly add individual names
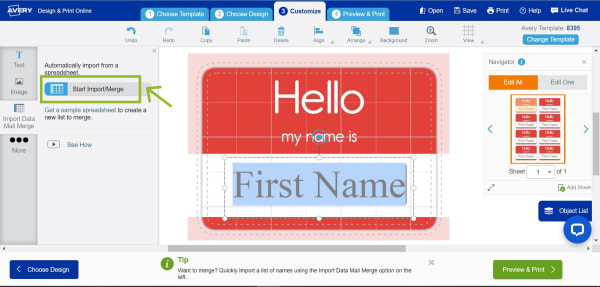
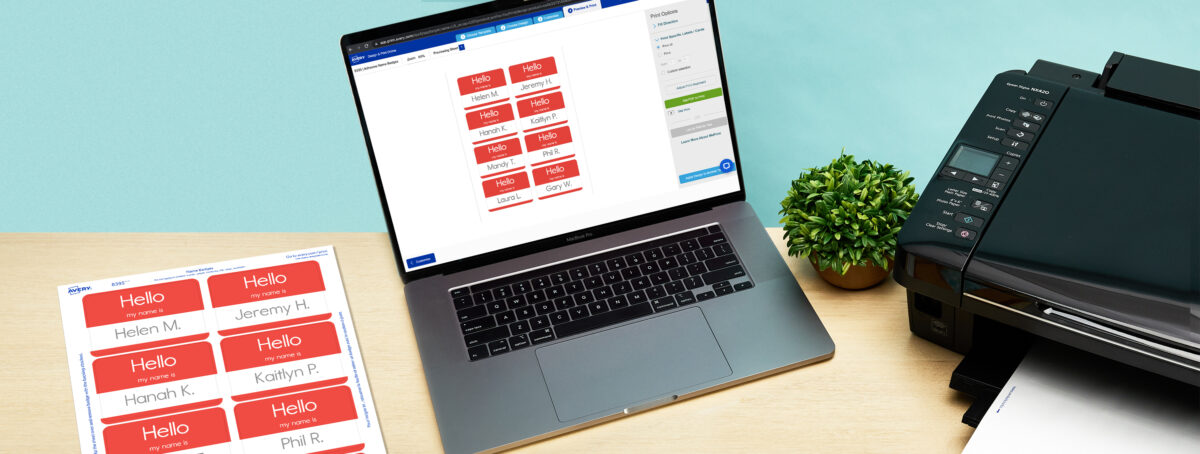
Instead of manually typing in names, you can import them from a spreadsheet.
Make sure Edit All is selected, then choose the lmport Data/Mail Merge tool. Click “Start Import/Merge” and follow the prompts.
On the left-hand menu mentioned above, you will also find the Import Data/Mail Merge tool. Mail Merge is a huge boon for creating name tags because it allows you to import names from a spreadsheet rather than manually type in each one. If you’re not familiar with using this function, this article takes the mystery out of the mail merge process.
Best name tag font
The best name tag font is one that is easy to read. Classic print styles like Times New Roman and Georgia are both great examples, as are clean, sans-serif fonts like Arial, Helvetica, Verdana, and Calibri. Avoid overly curly-cue or stylized “handwritten fonts.” These fonts can be beautiful, but they can also be difficult to read, especially for people with dyslexia or other reading disabilities.
Additionally, the size and weight of the font you choose are very important. When you are adding names to a badge, pick the longest name from your list, then increase the font size until it fills up a good portion of the space. Then you will know the font is as big as it can be while still fitting everyone’s names. As for the weight of the font, avoid very thin fonts in general, as the lines may appear too light to easily read. Check out this article for a deep dive on what makes a font easy to read.
How to include a logo on a name tag
In general, adding a logo to a name tag uses the same steps as adding an image. Basically, you will choose the editing tool to add an image, then select it from your computer’s files. For example, in Avery Design and Print Online (ADPO), you click the Image tool, and in Word, you choose “Insert Pictures,” located under the “Insert” tab. However, first you need to make sure your logo file is JPG (or J-PEG), PNG, or PDF. Additionally, the logo should be at least 192 pixels by 192 pixels with a DPI (dots per inch) setting of 300 or greater. A DPI lower than 300 will result in a blurry or pixelated logo on your name tag.
If you don’t have a logo, you may want to check out our article with tips for designing one. If you already have a logo, this video will demonstrate the steps for adding logos or images using ADPO, but we’ll also list the steps here for you to reference:
- Choose the Image tool in the left menu
- Click the “Add Image” button
- Click “Browse for File”
- Choose your logo file from your computer
- Click “Open” to upload to ADPO
Once the logo has been added to your ADPO design, simply click on it and drag to reposition or resize.
5) Save, download, and print
Choose to print yourself or use WePrint. Then save your project to your Avery account for free in the cloud.
Once you’ve saved your project, you can download a PDF and print it.
Most printable Avery products have the option to be custom-printed with the Avery WePrint® service. If the product is available for custom printing, there will be a button that reads “Let Us Print for You” when you progress to the “Preview & Print” tab. Once you make a choice, you’ll be prompted to save your name badge project. This is a great idea because you can make edits later, reprint, apply your design to a different Avery product, and even share projects via email.
IMPORTANT: When printing yourself, the steps are slightly different for different browsers. If you're not familiar with printing from a browser, this article walks you through it and has specific instructions for different browsers, including Firefox, Microsoft Edge, Safari, and Google Chrome.
Tips for printing Name Badges
In general, there are four basic tips you can follow to successfully print your own name badges (or any Avery product). Firstly, carefully follow the printing instructions that pop up on the screen. Secondly, always review your PDF file thoroughly. Your PDF displays an exact preview of how your name badges will print. If you need to make any changes, click “Edit My Design” to go back to the editing screen.
Thirdly, set the scale to 100% and always print a test sheet on a regular piece of paper first. You can place the paper over the blank name tag sheet and hold it up to the light to check that your design properly lines up with the stickers. If it doesn’t, you can review your settings or go back and edit the design before printing on the name tag sheet. Lastly, change your printer paper settings to “Cardstock,” “Heavy Weight,” “Labels,” or “Specialty.” This will communicate that the sheets you are printing on are thicker than regular paper.
How to make a name tag in Word
1) Download Avery template for Microsoft Word

Go to our template finder page and enter the Avery product number.
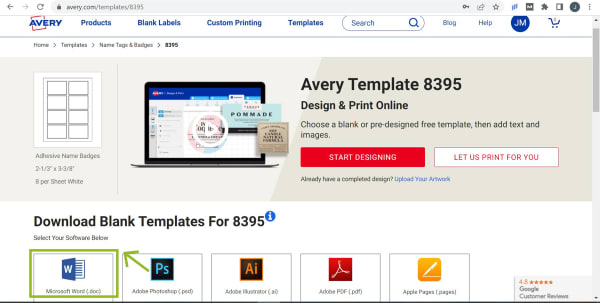
Click the Microsoft Word icon under the options for downloadable blank templates.
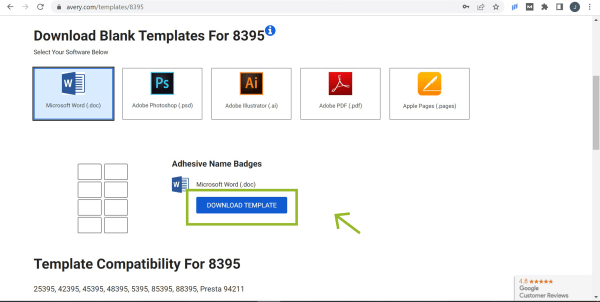
Click “Download Template.”
If you need more help, check out our article with instructions for downloading a Word template from the Avery website.
2) Use word tools to design your name tags
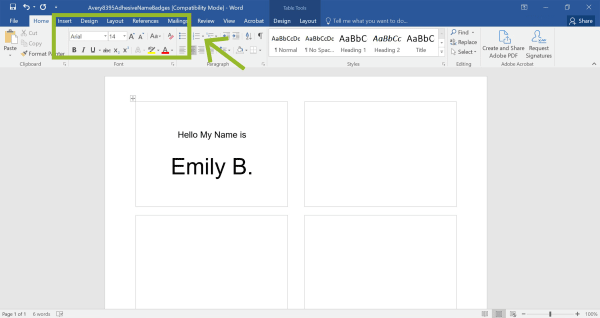
Click inside each name badge, then use Word tools to edit the design and add names.
3) Optional: Add more sheets

Place your cursor at the end of the text on the last name badge in the bottom right. Then press the Tab key until an additional sheet of blank name tags appears.
Copy and paste your design, and fill in more names as needed.
Use this article for more help adding pages in Microsoft Word.
4) Print your name tags
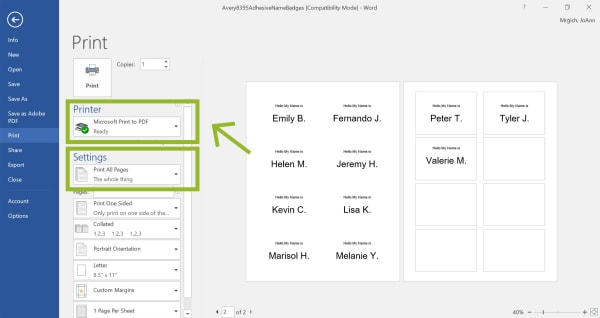
Use the printing tips above to check your design* and make sure your printer settings are correct.
Click “print” as usual.
*Don’t worry if the name badge borders don’t show for each sheet; it’s just how some versions of Word display.
Why name badges are great for social events
People who organize events or run businesses use name tags because they’re a great way to help guests, attendees, and employees connect with each other. In fact, name tags promote connection in several key ways. First, they make it easier to start conversations. Secondly, they help you remember people’s names. Thirdly, they promote professionalism in business settings, and lastly, creative name badge designs can be fun, which makes a great impression at any type of event.
Avery name tags, in particular, are fantastic for events of all kinds, including social events, business events, and special occasions like weddings. The variety of styles and free templates online make it easy for anyone to create name badges for parties, school, or work functions.
Create name badges for free online with ADPO or design with Word
To summarize, there are many benefits to using Avery Design and Print Online (ADPO) to make name tags. Firstly, you can do it online for free, and there are hundreds of free name tag templates to choose from. These are the basic steps to making a name tag using ADPO:
- Go to the Avery template finder page and enter the Avery product number for the name tags you want to use.
- Click “Start Designing” on the template page.
- Choose a name badge template.
- Personalize your name badges.
- Save, download, and print.
Additionally, to help you make amazing name tags, we provided some helpful tips. For example, we covered how to choose the best name tag font and how to include a logo on a name tag.
We also covered the steps of how to make a name tag in Word, which are summarized as follows:
- Download the Avery template for Microsoft Word.
- Use Word editing tools to design your name tags.
- Optional: Add more sheets.
- Print your name tags.
Name tags are a popular choice for helping people connect at a variety of events for socializing, business, and school. How will you use name tags at your next event? Join the conversation on Facebook and share your creative name badge ideas on Instagram using #averyproducts.