Transparency Artwork Guidelines
The upload process is quick and easy. Simply upload your ready-to-print art file, assign a name and position your artwork within the label. Click Finish to complete your design.
If you have any questions regarding setting up your artwork or selecting the right file types, please call our Customer Care Center at: Phone: (800) 462-8379 | Mon. to Fri. 6 am – 5 pm PT, Closed Sat & Sun
Before uploading artwork, please note the following:
Resolution independent images using points, lines & shapes that can be resized without loss of quality.
Resolution dependent images that use a grid of small dots & lose quality when resized.
(preferred)
CMYK is a subtractive 4-color printing process that used cyan, magenta, yellow & black inks. It is subtractive since light is reflected off the paper.
RGB is an additive light-based color used for computer monitors that includes red, green & blue. It is additive since direct light is used to display color.
If available, save your artwork as a high-resolution Adobe PDF with Press Quality selected to avoid poor print quality. PDF is an open format, and some PDF elements are not printable. We suggest applying PDF/X to ensure all elements of your art file can be printed.
Word processors, spreadsheets, presentations, PDF readers and rudimentary image editing programs are not the ideal choice for editing or creating graphics. Also, we do not recommend using Adobe Reader to edit your PDF files. Use our free professional online design software or applications like Adobe Creative Suite, CorelDraw or QuarkXPress to export an Adobe PDF with Press Quality.
Upload Art

You can upload the following types of images for creating your roll labels:
Vector Images: Resolution independent images that use points, lines, and shapes and can be resized without any loss of quality. Vector images include EPS, PDF, AI, and SVG.
Raster Images: Resolution dependent images that use a grid of small dots that lose quality when enlarged. Raster images include PNG, JPEG, JPG, BMP, PSD, TIFF, and TIF.
When possible, save your artwork as a high-resolution Adobe PDF with Press Quality selected. We also suggest applying PDF/X to ensure all elements of your art file will be printed as you see them.
Prepare Your File for Upload
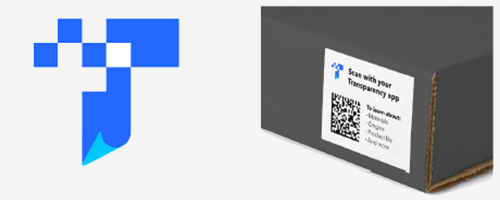
A Transparency 2D data matrix barcode will be added to your labels, so you need to reserve an empty space measuring a minimum of 0.54” inch (13.7 mm) on your label for the barcode. The barcode will be unique for each label based on the Transparency codes from Amazon. The space you create will need to include the Transparency “T” logo, the barcode and the Amazon instructions to the right or bottom.
Label requirements for Transparency:
- Designate space for the data matrix barcode and Transparency identification
- Include the Transparency “T” logo using Amazon approved imagery
- Add instructions as outlined in the Transparency Onboarding Guidelines
For more details, please refer to the Transparency Onboarding Guidelines that your Amazon onboarding specialist provided.
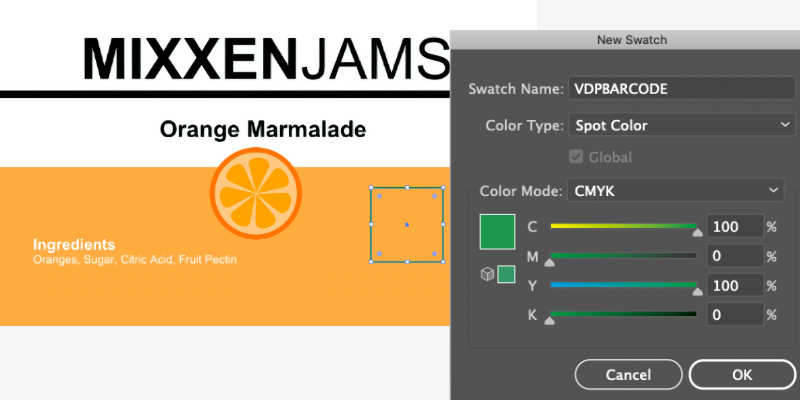
Assign the Data Matrix Barcode
To choose where the data matrix barcode goes, create a spot color named VDPBARCODE. Use this spot color in your artwork.
Create a square shape and assign the spot color to the stroke, fill or both. This is the space you will designate for the data matrix code on each label.
If you still need help, you can also provide your artwork and Transparency codes to Avery and we will be happy to help create your Transparency labels for you.
Name Your Design
You can upload many different art files and Transparency codes, so we suggest using a meaningful name for each art file to help you keep track.
Art Position

Once your art file has been uploaded, you can resize and reposition it within your selected label shape.
Use the Move Art and Scale Art options on the left toolbar.
Position, Size & Rotate Your Art
To reposition your image, simply grab it and drag it to where you want to place it. To help with the alignment, you’ll see positioning lines in the center and on each side. Your image will slightly adjust (snap) to these lines to assist you. You can unlock the Snap to Edge tool if needed but please review Safety & Bleed Lines below before doing this.
To resize your art file, select and hold the corner or side controls around your art. Your cursor will change to an arrow. Then resize your art as needed. Use the Zoom tool to view more or less of your entire label.
You can also rotate your image in 5-degree increments by using the lollipop handle on the top of your image.
You can use your keyboard cursor (arrow) keys to resize your image as well. Hold the Shift key down while using the cursor keys to move the image in small increments. Rotate your image by holding the Control key down when using your cursor keys.
Move Art
Use the Move Art arrow buttons in the left toolbar when you need even greater precision.
The Rotate Art tool allows you to rotate your image in 90-degree increments based on its current position. Be careful to remember your unwind direction.
Scale Art
Resize your image in small increments using the Plus (+) and Minus (-) buttons in the Scale Art tool. Uncheck Lock Ratio to size the height and width of your image independently.
Choose Fit to Safety Line or Fit to Bleed Line depending on your needs. For roll labels, we recommend keeping your image stretched to the bleed lines to ensure full-color coverage of your entire label.
Safety, Trim & Bleed
These Safety and Bleed lines are not printed on your label. They are for layout purposes only.
Fit to Safety Line: Keeping your art within the safety line will ensure all design elements will be printed on your labels. This will add a small border around your label based on the color of the material you have selected.
Fit to Bleed Line: Stretching your art to the bleed line will ensure your art covers the entire label. This is the most common approach and requires that your art include an area on all sides that can be trimmed.
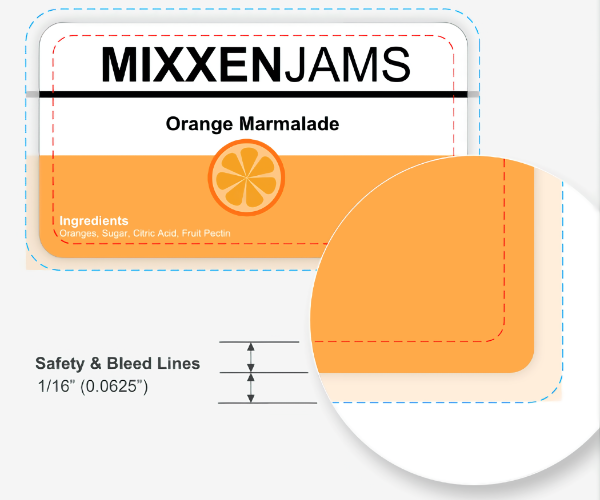
Note: Do not fit your art to the trim line between the safety and bleed lines. The printing, cutting, and winding of your roll labels may result in elements of your design getting cut off or a thin outer strip of material being exposed.
Art Stretched Too Large
We suggest a minimum of 300 PPI (pixels per inch) for your art. Overstretched art or a lower resolution image could potentially appear blurry when printed. For low-resolution images, consider reducing your label size or using a higher resolution image for better print results.
Optimize Art for Print
Many image formats are not entirely suitable for printing. For example, bit-depth, color space, transparency, and other image attributes can produce undesired results. When found and repairable, these image properties are automatically optimized for the best possible viewing and printing.
Avery uses GRACol 2013 color standards for consistent and reliable color reproduction. When available, assigning an ICC color profile to your image will ensure better color conversion for printing.
Flattened for Viewing
Some artwork formats are difficult to represent on screen. For example, AI and PDF files can include many layers and clipping groups. For viewing purposes, we may flatten your image. However, your original art file will be used for printing.
Adjusted for Viewing
Some formats are difficult to represent outside of the graphic software where they were created. Adjustments may be applied to help you resize and reposition your art file, but the original file will be used for printing.
* Flat rate shipping offer applies to economy shipping only. Free shipping offer applies only to orders with a merchandise total of $50.00 or greater (after discounts, before shipping, and tax). Offer applies only to economy shipping and to orders shipped within the continental United States and Puerto Rico. Offer subject to change.