Cute Rainbow Greeting Card, Step by Step with Pictures
Help your kids send a smile with this cheerful rainbow card-making activity for kindergarten aged kids and up. A great introduction to step-by-step card-making for beginners, this tutorial includes easy-to-follow instructions with pictures and a handy clickable shopping list for mom or dad.
Perfect for creating thank you cards, thinking of you cards or friendship cards. Younger kids can practice fine motor skills making cards for Grandma and Grandpa. Older kids will love making handmade greeting cards to send to friends.
Rainbow greeting card material list
- 5-1/2" x 8-1/2" half-fold blank greeting cards (3378)
- Assorted color-coding stickers:
- Cotton balls
- Pencil & eraser
- Markers, crayons or colored pencils
- Glue stick
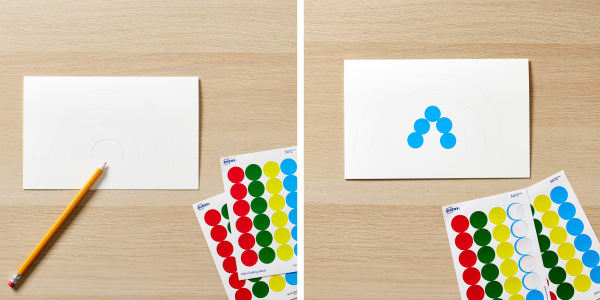
Step 1: Create a guide for the rainbow on your greeting card
Layout a blank half-fold greeting card, front side up in a horizontal position (so that it opens upward). In pencil, lightly trace a small arc near the bottom middle of the front of your greeting card.
Step 2: Fill in the rows on your rainbow greeting card
Start with 3/4" blue color-coding stickers to fill in the first row of your rainbow. Place them on your greeting card along the first traced line. Continue in backwards rainbow order filling in green, yellow, orange then red.
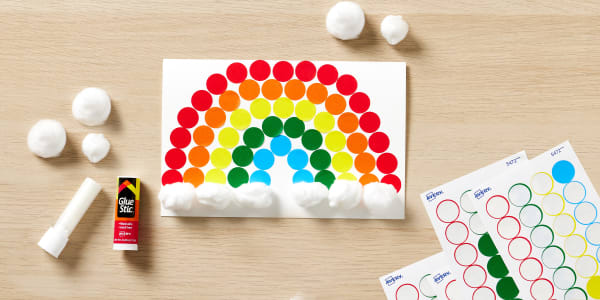
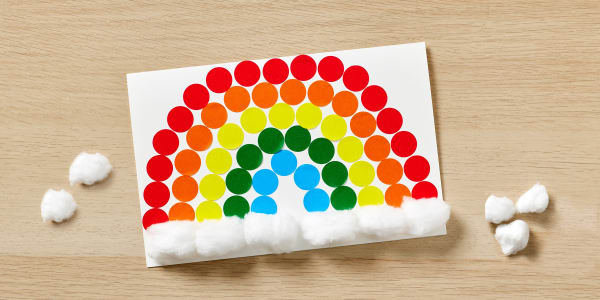
Step 3: Add 3D fluffy clouds to your greeting card
Use your glue stick to add cotton balls to the ends of your rainbow. Place the cotton balls as close together as you can so that it looks like a cloud.
Step 4: Write a message in your greeting card to finish
Use markers, crayons or colored pencils to write a message to a friend or family member inside your greeting card. Add drawings or any other decorations that you think will make them smile!
Send a smile anytime with more greeting card ideas
Try our free pre-designed card templates for an easy way to make greeting cards at home. They’re easy to quickly personalize and print on your home printer, or have us print them for you. Browse a variety of blank card styles and discover more greeting card projects and tutorials for the whole family.
Was this tutorial helpful? Tag us on Instagram to show off your rainbow greeting cards!