

Easy SDS Guide: What are the 16 Sections of Safety Data Sheets
Understanding the 16 sections of a Safety Data Sheet (SDS) is crucial for maintaining a safe workplace. This is because SDS sections provide essential information on the identification, hazards, handling, and disposal of chemicals. Additionally, employees and safety personnel can use each section to identify potential risks. They can then implement appropriate protective measures and comply with regulations. Of course, keeping SDSs organized and easily accessible is vital. This ensures quick reference in emergencies and helps make informed decisions about chemical safety. Moreover, SDS binders keep these documents well organized and readily available, ultimately protecting both workers and the environment.
What are the 16 sections of SDS
All in all, there are 16 sections in SDS, although OSHA only requires sections 1-11 and 16, and sections 12-15 are optional. Further in this article, we’ll take a deep dive into the 16 sections of information included on Safety Data Sheets (SDS) according to Appendix D to OSHA regulation 29 CFR 1910.1200. What’s more, we’ll give an overview of SDS and explain the four section categories. In brief, here are the 16 sections of SDS and what they include:
- Section 1—Identification: Provides the chemical’s name, recommended use, restrictions, and supplier contact details.
- Section 2—Hazard Identification: Outlines the chemical’s risks, including hazard classification, signal word, hazard statements, pictograms, and unclassified hazards.
- Section 3—Composition/Information on Ingredients: Lists the chemical’s components, including impurities and stabilizing additives, which contribute to its overall classification.
- Section 4—First Aid Measures: Provides first aid instructions for exposure routes, symptoms, and recommendations for immediate medical care or special treatment.
- Section 5—Firefighting Measures: Outlines firefighting instructions, including extinguishing methods, precautions, and fire-related hazards.
- Section 6—Accidental Release Measures: Details emergency procedures, protective equipment, and cleanup methods for chemical spills or leaks.
- Section 7—Handling and Storage: Provides guidelines for safe handling, storage, hygiene, and avoiding storage incompatibilities.
- Section 8—Exposure Controls/Personal Protection: Specifies safe exposure limits and protective measures to prevent excessive personal exposure to the chemical.
- Section 9—Physical and Chemical Properties: Lists the chemical’s key characteristics, including appearance, odor, pH, boiling/melting points, flammability, vapor pressure, and solubility.
- Section 10—Stability and Reactivity: Details the chemical’s stability, hazardous reactions, conditions to avoid, incompatible materials, and decomposition products.
- Section 11—Toxicological Information: Provides health risks, including exposure routes, symptoms, acute and chronic effects, toxicity measures, and carcinogenic potential.
- Section 12—Ecological Information (non-mandatory): Assesses environmental impact, including bioaccumulation potential, ozone depletion, and groundwater absorption.
- Section 13—Disposal Considerations (non-mandatory): Provides guidance on safe disposal, recycling, or reclamation of the chemical and its container, including disposal methods and precautions for landfills or incineration.
- Section 14—Transport Information (non-mandatory): Details transport guidelines, including UN number, hazard classes, packing group, and special precautions.
- Section 15—Regulatory Information (non-mandatory): Lists additional safety, health, and environmental regulations, including regional details not covered elsewhere.
- Section 16—Other Information: Indicates the preparation and last revision dates, and any additional details or updates not covered elsewhere in the SDS.
A brief overview
What is a Safety Data Sheet (SDS)?
When using or transporting a chemical, it’s essential to understand the risks involved. Accordingly, a Safety Data Sheet (SDS) is a document that includes safety information for a specific chemical. Moreover, physical SDS can actually be a single sheet of paper or many—it really just depends on how much information there is about the chemical. Additionally, SDS are an OSHA requirement. In fact, Appendix D to OSHA regulation 29 CFR 1910.1200 regulates the formatting and required information of these sheets. Essentially, OSHA requires companies to include SDS when making, distributing, or shipping chemicals.
MSDS vs. SDS
Is an MSDS the same as an SDS? The quick answer is no, but they’re similar. Both are documents that provide information about specific chemicals so that the people handling them know how to do so safely. While MSDS stands for Material Safety Data Sheet and SDS stands for Safety Data Sheet, the differences don’t end there. Prior to 2012, the U.S. commonly used MSDS for chemical safety, but this system lacked standardization and global recognition. When OSHA adopted GHS (Globally Harmonized System) guidelines for chemical safety in 2012, SDS became required in most cases. Even in the rare instances where OSHA regulations permit MSDS, using SDS often makes more sense because they are standardized and recognized globally.
Can SDS be provided electronically?
The short answer is yes, with conditions. The OSHA HazCom standard (1910.1200) does not specifically address this question, but there are two official OSHA communications that offer guidance. This interpretation letter dated 1990, which stipulates that electronic MSDS (which SDS replaced) can be used only when: 1) The system is able to print out a clear copy at the worksite, 2) employees can quickly and easily get this information while they’re working, and 3) nothing stops employees from getting the information when they need it, like not knowing how to use the system or not having a computer. This interpretation letter dated 1999 further explains that while electronic access to safety data is allowed, companies must have backup plans to ensure employees can always access safety information quickly, especially in emergencies.
What do Safety Data Sheets include
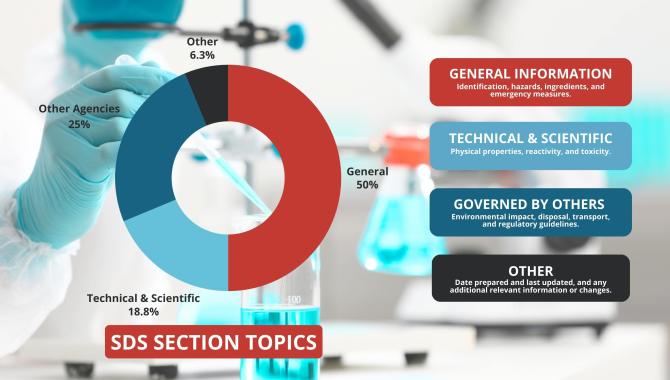
Safety Data Sheets (SDS) include information about hazardous chemicals, but what kind of information? Specifically, SDS sheets contain four main types of information: 1) general information about the chemical; 2) technical and scientific data; 3) information from other agencies; and 4) additional details. This information helps anyone who works with chemicals understand the risks, how to avoid them, and what to do in an emergency.
16 sections of Safety Data Sheets explained
Altogether, there are 16 SDS sections of a Safety Data Sheet. As previously noted, SDS information is grouped into four categories.
- General information. Key safety information and procedures for handling chemicals, including identification, hazards, ingredients, first aid, firefighting, accidental release, handling, storage, and protective measures.
- Technical and scientific information. I.e., the physical properties, reactivity, and toxicity of a chemical.
- Information governed by other agencies. This includes a chemical’s environmental impact, disposal, transport, and regulatory guidelines.
- Other. The last date that the SDS was updated, the original preparation date, and any additional relevant information or changes.
First, we’ll examine how the SDS sections categorize topics, then we’ll dive deeper into each of the 16 sections.
Table: How the 16 sections of SDS are categorized
| Category | Sections |
|---|---|
| General Information | 1-8 |
| Technical & Scientific Information | 9-11 |
| Information Governed by Other Agencies | 12-15 |
| Other Information | 16 |
Infographic: Safety Data Sheet sections by topic
SDS Sections 1-8: General Information
As you might expect, the first eight sections of an SDS contain information most needed for quick access. Moreover, sections 1-8 include examples of information such as identifying the chemical and its composition, how to handle and store it, and exposure limits.
1) Identification
Section 1 of an SDS tells you what the chemical is, how to use it properly, how not to use it, and how to contact the supplier. In particular, it includes the product identifier, common names/synonyms, recommended use, restrictions on use, and the name, address, phone number, and emergency phone number of the manufacturer or distributor.
2) Hazard(s) Identification.
SDS Section 2 warns you of risks associated with the chemical on that particular SDS. For example, hazard classification, signal words, hazard statements, pictograms, precautionary statements, and descriptions of unclassified hazards are all required. For mixtures, you should also disclose the percentage of any ingredient with unknown acute toxicity.
3) Composition/Information on Ingredients.
The third section on an SDS tells you exactly what makes up the product, including impurities and stabilizing additives. This is important because impurities and stabilizing additives have their own classifications and contribute to the overall classification of the chemical substance. To begin with, all substances should have the following listed in Section 3: chemical name, common name/synonyms, Chemical Abstracts Service (CAS) number, and other unique attributes.
You must also include the chemical name and exact percentage (concentration) if the chemical meets the following criteria:
- The chemical includes additional ingredients classified as health hazards.
- The additional ingredients are present in an amount greater than the concentration limits or exhibit a health risk below the concentration limits.
Additionally, you can use percentage ranges on Safety Data Sheets for mixtures with batch-to-batch variation, a group of substantially similar mixtures, or if there is a trade secret claim. However, if you withhold exact percentages due to a trade secret claim, you must include a statement in Section 3 indicating this.
4) First Aid Measures
Information required for SDS Section 4 includes a description of symptoms and effects (both acute and delayed). This includes:
- First aid instructions for exposure through inhalation, skin and eye contact, and ingestion.
- Recommendations for immediate medical care or special treatment when necessary.
5) Firefighting Measures
This part of an SDS tells you what to do in case of fire caused by the chemical. Required information includes appropriate/not appropriate extinguishing equipment, special equipment/precautions for firefighters, and advice on specific hazards that develop from the chemical during the fire.
6) Accidental Release Measures
SDS Section 6 tells you what to do if the chemical spills, leaks, or is otherwise released. It includes required information on emergency procedures, protective equipment, and appropriate cleanup and containment methods.
7) Handling and Storage
Section 7 on your SDS provides a guideline for safely handling and storing chemicals. Requirements include information for safely handling the chemical to minimize release into the environment, general hygiene, as well as conditions for safe storage, specific storage needs, and storage incompatibilities.
8) Exposure Controls/Personal Protection
SDS Section 8 helps you avoid personal exposure to chemicals in unsafe quantities or over unsafe time periods. It also lists the maximum safe exposure levels and the protective measures you should use to handle the chemical safely. For example, appropriate engineering controls, personal protective equipment (PPE), and any special material and/or resistance requirements for PPE are all required.
Additional information required for exposure includes:
- OSHA Permissible Exposure Limits (PELs)
- American Conference of Governmental Industrial Hygienists (ACGIH)
- Threshold Limit Values (TLVs)
- Any other limits recommended for safety

Sections 9-11: Technical & Scientific Information
Safety Data Sheets organize technical and scientific information into Sections 9 through 11 (and sometimes Section 16). Moreover, these sections require very specific and detailed information, so you cannot leave them blank. Therefore, if there is no relevant information for a required element in any of these sections, you must clearly state this in the appropriate field on the SDS.
9) Physical and Chemical Properties
This section lists the chemical’s characteristics on the SDS. Consequently, the minimum required fields include:
- Appearance (physical state, color, etc.)
- Auto-ignition temperature
- Decomposition temperature
- Evaporation rate
- Flammability (solid, gas)
- Flash point
- Initial boiling point and boiling range
- Melting point/freezing point
- Odor
- Odor threshold
- Partition coefficient: n-octanol/water
- pH
- Relative density
- Solubility(ies)
- Upper/lower flammability or explosive limits
- Vapor density
- Vapor pressure
- Viscosity
10) Stability and Reactivity
SDS Section 10 tells you how stable the chemical is and the likelihood of hazardous reactions. What’s more, the required information divides into three clear sections:
- Specific test data for the chemical, class, or family.
- Indicate whether the chemical is stable or unstable at regular room temperature during storage and handling, note any stabilizers needed, and describe any changes in physical appearance that indicate safety issues.
- Identify possible hazardous reactions, conditions to avoid, incompatible materials, and any known or anticipated hazardous decomposition products that use, storage, or heating could produce.
11) Toxicological Information
This section of an SDS provides you with health risks associated with poisoning from the chemical. The required information includes routes of exposure, related symptoms, acute and chronic health effects, numerical measures of toxicity, and whether the chemical is considered carcinogenic.
Sections 12-15: Information Governed by Other Agencies
It’s important to note that OSHA requires Safety Data Sheets to contain Sections 12–15 to uphold GHS guidelines. However, OSHA does not enforce the content included in those sections. Instead, other agencies, such as the Environmental Protection Agency (EPA), enforce and govern the content in SDS Sections 12–15.
12) Ecological Information (non-mandatory)
If chemicals are accidentally released, then the information in SDS Section 12 can help you determine the environmental impact. For instance, examples of this type of information include bioaccumulation potential, ozone layer depletion, and groundwater absorption studies.
13) Disposal Considerations (non-mandatory).
When you need to safely dispose of, recycle, or reclaim a chemical and/or its container, Section 13 is key. For example, if you need to know about appropriate disposal containers, disposal methods, or physical and chemical properties that may affect disposal, this section provides that information. Additionally, it includes language discouraging sewage disposal and any special precautions for landfills or incineration.
14) Transport Information (non-mandatory)
In general, SDS Section 14 provides information for shipping and transporting hazardous chemicals by road, air, rail, or sea. Specifically, this type of information can include the UN number and shipping name, transport hazard classes, and packing group number. Additionally, it may cover environmental hazards, bulk transport guidance, and any special precautions associated with transport.
15) Regulatory Information (non-mandatory)
Section 15 includes any additional safety, health, and environmental regulations not indicated elsewhere on the SDS sheet. For example, regional regulatory information is commonly found in this section.
Section 16: Other Information
Lastly, within Section 16, you’ll find the date of the most recent update and any other useful information not included elsewhere in the SDS. For instance, you may find the SDS preparation date, the last known revision date, and where changes were made in the most recent revision.
Final thoughts on the importance of understanding SDS sections
In conclusion, understanding the 16 sections of a Safety Data Sheet (SDS) is essential for maintaining a safe workplace. Each section provides critical information that helps employees and safety personnel identify potential risks and implement appropriate protective measures. Moreover, by keeping SDSs organized and easily accessible, companies can ensure quick reference during emergencies, making informed decisions about chemical safety more straightforward.
Whether you’re handling hazardous materials daily or only occasionally, staying informed and prepared is key to minimizing risks and complying with regulations. Taking these steps not only protects your team but also contributes to a safer, healthier workplace.
You can find more articles about workplace safety right here on our blog or join the conversation on LinkedIn and Facebook.
