Make labels you can print yourself or order professionally printed
Other articles you might like:
Do you need to know how to print address labels at home? Or are you wondering how to print on sticky labels for your office? Or maybe you need a large quantity of labels for your business and you aren’t sure of the best way to print your labels. Based on almost a century of label printing experience and the top questions we’ve received from our customers; we’ve got the answers you need.
Before you print your labels
In this article, you’ll see how to print labels yourself or order your labels professionally printed to get the best quality possible. You’ll learn how to select the right labels for your printer, how to design your labels, how to prepare your printer settings, and how to troubleshoot common printer issues.
Not sure what printing method is better for your situation? Check out Printing Your Own Labels vs. Professional Printing to help you make the best decision for your project. Or watch the quick video below.
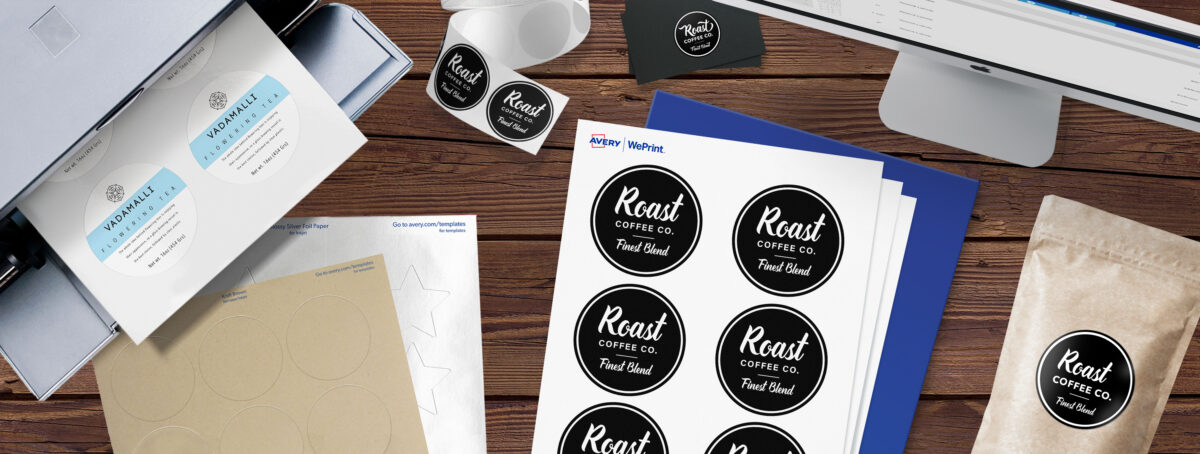
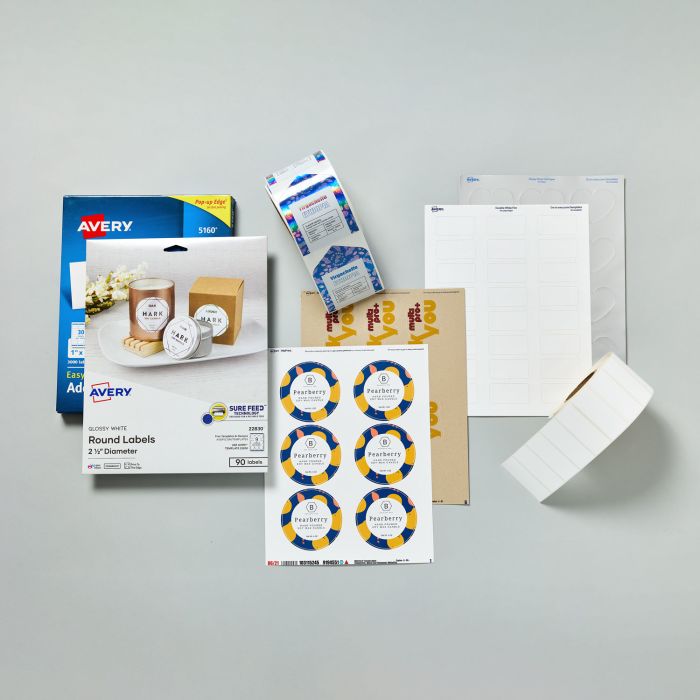
With Avery, you have the convenience of buying your labels online in minutes, whether you print the labels yourself or let us do it for you. For DIY labels, you can order our blank labels by the sheet with no minimums or use our popular retail packs. For larger orders or when you need a professional printing job, then try Avery WePrint, our top-rated custom printing service.
How to print label stickers
1. Buy the correct labels
The first step in printing your best labels is to make sure you buy the right labels. One of the most common mistakes is purchasing labels that are incompatible with your printer.
Inkjet and laser printers work differently. Some Avery labels will work with both but for the best print quality, most Avery labels are engineered to work with one or the other. If you use laser labels in an inkjet printer, the ink will not absorb properly which causes smearing. Likewise, if inkjet labels are used in a laser printer, the toner will not adhere properly and will begin flaking.
An easy way to know what type of printer you have is by checking your cartridge type. Small ink cartridges are used with inkjet printers and larger toner cartridges are used with laser printers. If you’re still not sure, visit the manufacturer’s website or contact them for the most accurate information.
2. Pick the right label for your design
The next thing to keep in mind when choosing labels is knowing which labels will work best for your design. Does your label design use a full-color background or do you need to print a full-page design? Make sure that you choose labels that will provide the best results for the design you have in mind.
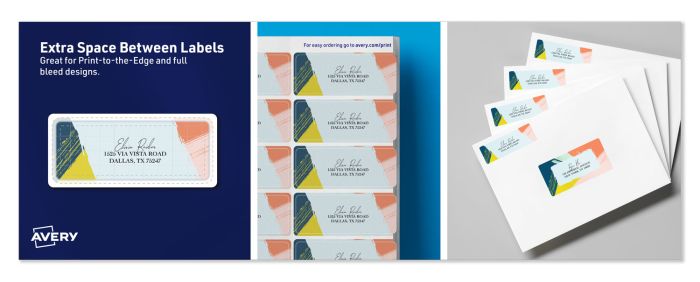
Designs that fill the entire label are known as full-bleed. The design will need to print beyond the label edge to achieve this look. That is why print-to-the-edge labels are perfect for projects that are focused on colorful and impactful designs. If you are printing a large quantity of full-color labels, it might be more cost-effective to order custom labels instead of using your personal ink supply.
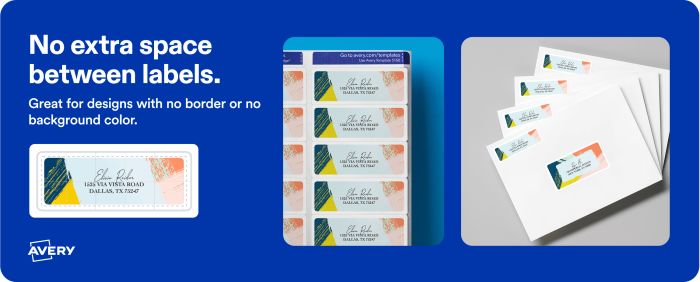
Labels without space between them are better for designs that use borders or no background color at all. This condensed layout also allows for more labels per sheet, making this more cost-effective. For example, address labels for mailing lists and file folder labels would work perfectly with this sheet design.
Unique Label Formats
Full-sheet labels
If you are having trouble finding the exact label size or shape you need, a full 8-1/2″ x 11″ sheet label could be a good option. You can print out unique shapes and sizes and then cut them yourself with scissors or a cutting machine.
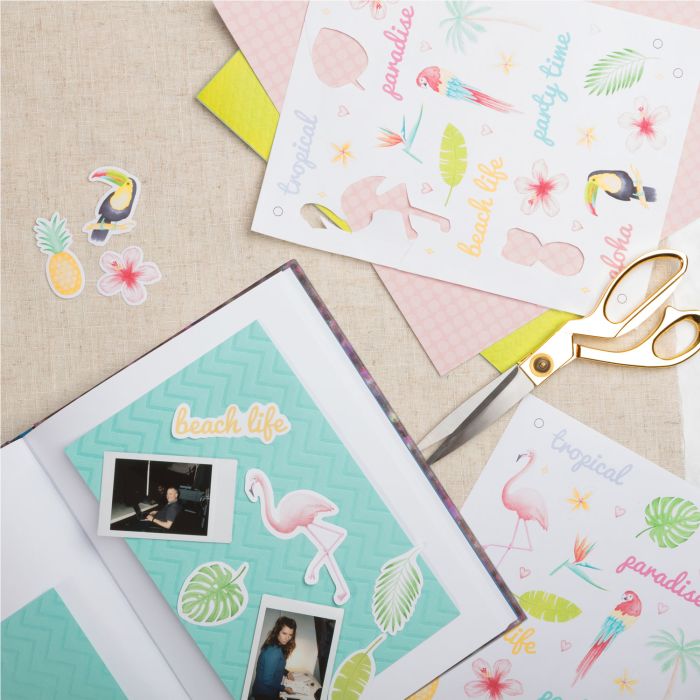
When using full-sheet labels, make sure that your design stays away from the non-printable edges of the sheet. Some printers can print to the edge of the sheet but most will leave a blank margin around the sheet.
You can also order custom sizes on our blank sheet labels, and our custom printing service offers both custom shapes and sizes at no extra cost so you don’t need to cut out the labels yourself.
4 x 6 label sheets
Smaller 4″ x 6″ sheets of labels are a convenient size for storing and transportation. But check your printer options to confirm that it can print on this paper size.
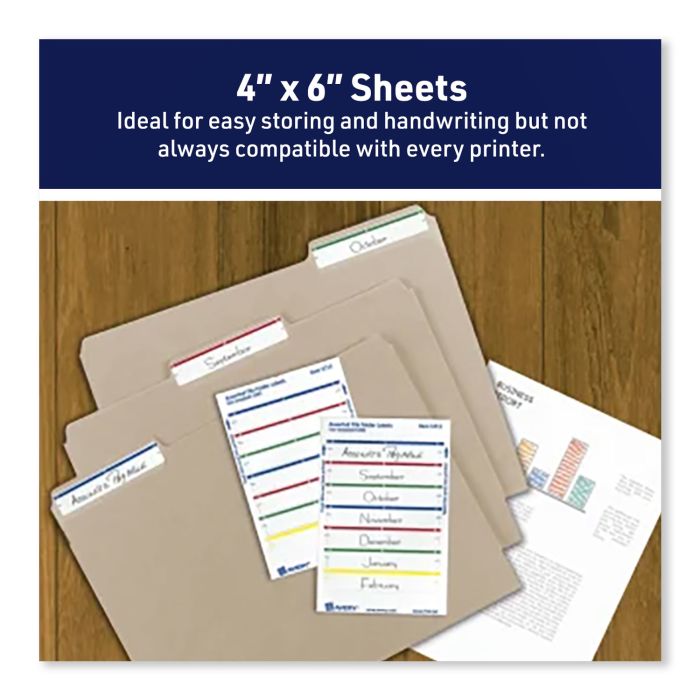
Use our guide on how to choose the correct label size to determine the exact size label you need. Once you have the right labels, keep them stored in the original packaging. Also store them in a cool, dry location, as humidity can cause label sheets to curl. The original packaging also contains the template number and printer compatibility.
3. Use the matching Avery template
A common mistake that leads to print misalignments is using the wrong label template for your product. While other label companies claim to match Avery templates, our templates are designed only for Avery products. For instance, if you search “Avery labels 5160 how to print address labels”, you’ll see Avery templates appear first. Always make sure any template you find online is designed by Avery or it may not align correctly with your labels.
Check the packaging or the Avery label sheet to find the 4–5-digit product or template number. Use that code to find the exact label template you need. If you need more help, check out how to find templates on avery.com. You can even work offline by downloading blank Avery templates for Word, Pages, and Adobe editing software. Use our dedicated Help page to find tutorials for printing Avery products from different software, for example, this one that walks you through printing from Apple Pages.
Once you’ve found your template, you can use our free Design & Print software which automatically optimizes your design. It will display the safety area, warn you when your design is incompatible, and offer you a variety of editing tools. Our software also allows you to choose from thousands of designs that are already optimized for the best printing experience. Just personalize them your way and print them yourself or let Avery print them for you.
4. Understanding the label printable area
Before you begin the design process, it’s important to realize how much of your label space is printable so that you can know what kind of canvas you are working with and prevent crucial parts of your design from getting clipped during the print.
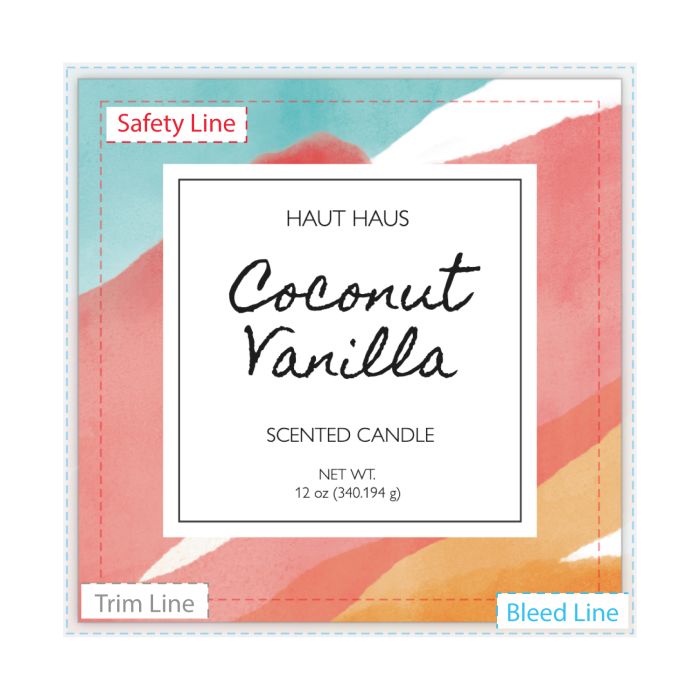
The printable area of a label is split into three sections:
Safety area: The section that is guaranteed to print on the label. Keep all of your important content such as text and business logos within this area.
Trim area: The physical border of the label. This border will give you a good approximation of where your design will be cut off.
Bleed or print-to-the-edge area: The extra design space outside the trim line that full-color backgrounds, images, and other content fill in order to have a print-to-the-edge or full-bleed design. Filling in this area ensures that there will not be any blank margins around your final label.
5. Design best practices
Unfortunately, the printers aren’t perfect. It’s common for sheets to shift slightly during printing. However, you can optimize your design by using safe, trim, and bleed areas to make any slight misalignments less noticeable. We also have a few tips you can keep in mind depending on the type of design you plan to print.
Adding text to labels
Keep vital information like names and addresses within the safety area to reduce the chance of crucial details getting cut off. Design & Print makes this easy to do by showing a warning when your content is moving out of the printable area. Check out our artwork guidelines for more information on designing and uploading artwork.
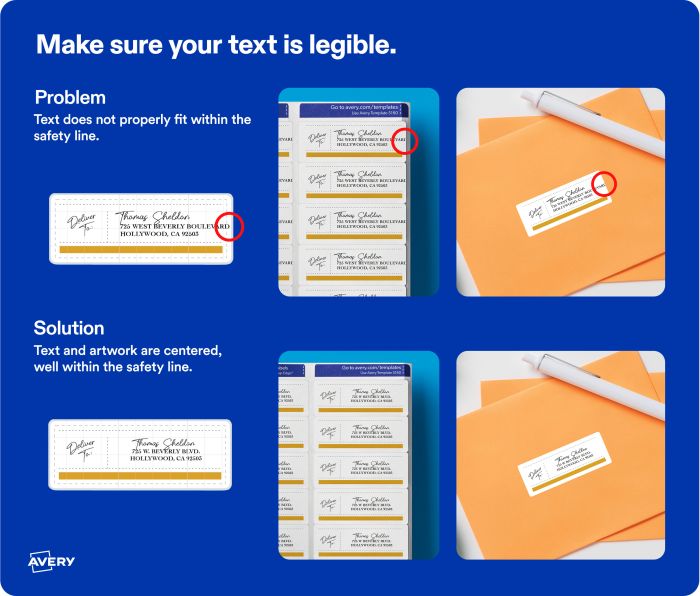
You should also make sure that your text will be legible when printed at the actual size. Your font may seem readable when the entire label is filling your screen but it can look very different once printed.
Try to use 7pt font or larger depending on the size of your label. Design & Print will also display a warning if your font size seems like it will be too small to read.
Check out How To Pick the Right Fonts for Your Labels for more ideas. Also, make sure that your font color will stand out and won’t blend into the background. Note: If you are using our free barcode generator make sure your labels can be read by a barcode scanner.
Achieve a full-bleed look
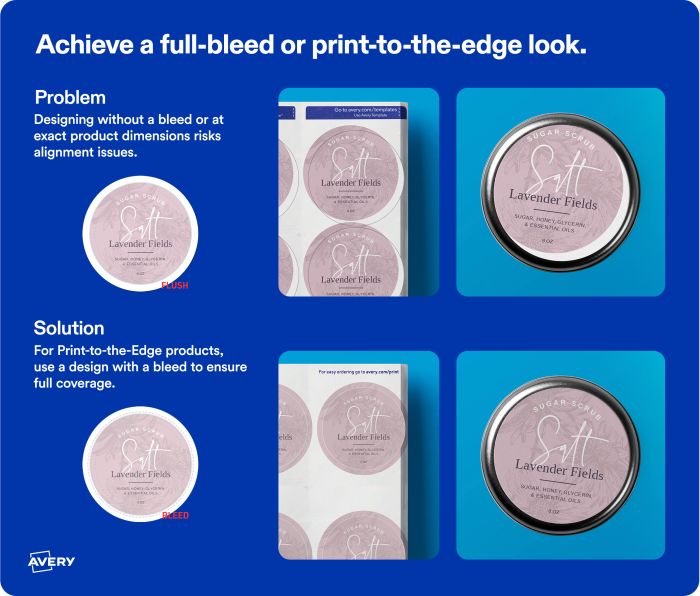
Not all labels are compatible with full-bleed designs so make sure that you are using the right template with print-to-the-edge labels. A quick way to check if you’re using the right template is to check if your design extends into the “bleed” area past the label trim line in the Design & Print software.
Prevent overlapping designs on labels
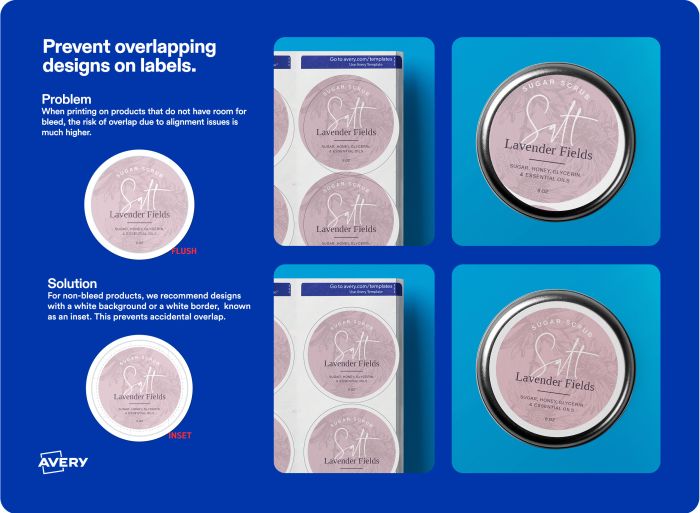
If the labels on your sheet do not have space between them, make sure that your design is comfortably within the safety area of your label. This will create a uniform border around your design and prevent your label design from printing on other labels on your sheet. You can also use completely blank backgrounds to make sure that your design won’t cross over onto other labels.
Using full-sheet labels
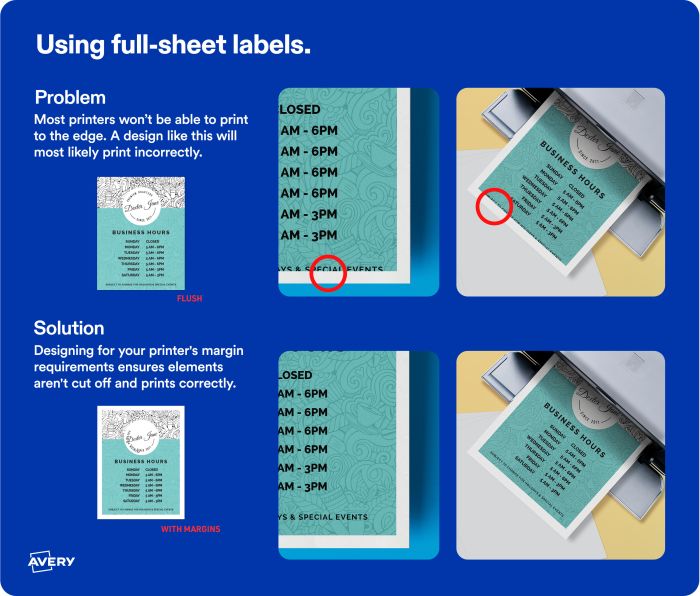
Most printers won’t be able to print to the edges of a sheet so it will be important for you to know the non-printable margins of your printer before printing your design on a full 8-1/2″ x 11″ label sheet. This area can vary depending on the printer model and manufacturer, but a .25″ margin around your design is a good general rule.
Design & Print Online will show a dotted line to help you visualize the page margin on label templates that go to the edge of the sheet. Test your print on a blank sheet and check your printer options to confirm the printable area of your printer.
6. DIY pre-print procedures
Before you print labels, the three big printer settings to check are your paper size, paper type, and page scaling. However, this can be tricky since these setting names can be different depending on the printer manufacturer. For instance, if you need to know how to print labels on HP printer, you can reference our help article on recommended printer settings for more assistance with navigating your printer options.
Paper size
In printer settings, the “sheet size” or “paper size” setting controls how your design is scaled to the label sheet. Make sure the size selected matches the size of the sheet of labels you are using. Otherwise, your labels will be misaligned. The most commonly used size is letter-size 8-1/2″ x 11″ paper. If you are using another sheet size, such as 4″ x 6″, make sure to change the paper size setting to 4″ x 6″.
Paper type
The “paper type” or “media type” setting changes the speed at which the sheet is fed through your printer. Change this setting to the “Labels” option to slow down the speed and reduce the risk of misalignment. If your printer does not have an option for “Labels,” you can select one of the options for “Cardstock,” “Heavyweight” or “Premium” instead. In some printers, the “Labels” or “Cardstock” option will also mean that your sheet will need to be fed through another tray like the manual feed tray. The manual feed tray will provide the best results since the sheet will be fed through the printer flat. This avoids having the sheet bend and curl while traveling up multiple printer rollers.
Page scaling
The page scaling setting should always be set to 100% or “actual size.” Never use the “fit to the page” option, which will cause your design to shrink to the wrong size and result in misalignment.
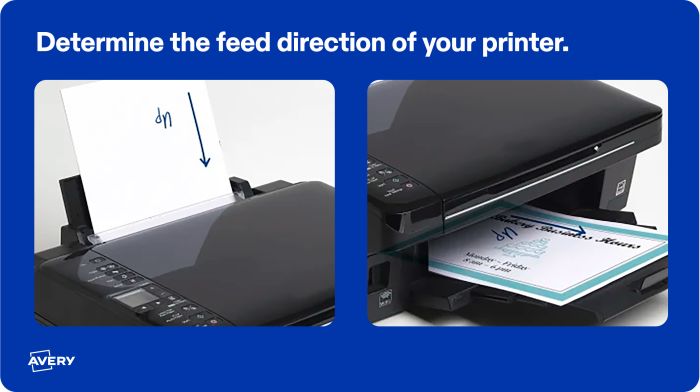
Once you have these options set correctly, make a test print on a blank sheet of printer paper to see how they come out. Mark your blank test sheet beforehand to show which side is up and in which direction the sheet is being fed so that you can confirm exactly how to feed the label sheets.
Most labels will just need to be fed with the right side facing up, but you can double-check the proper feed direction by checking your Avery label sheet.
7. Troubleshooting
Notice something wrong with your printing? Here are some fixes to common problems when trying to print labels.
Print misalignment
Q: Why is the entire print shifting in one uniform direction?
A: Unfortunately, numerous factors can cause this and the exact cause can be difficult to trace. However, you can shift the print on the last step of Design & Print by choosing the option to adjust the print alignment. Or you can adjust the margins of the print if you are using a downloadable template.
Q: Why are all of the labels printing toward a corner?
A: The cause of this is the print trying to “fit to the page” and not printing at the correct size. Double-check your page scaling settings to make sure that the print is set for “actual size” or to print at 100% scale.
Paper jam
Q: Why are my labels jamming?
A: Paper jams can occur from several different factors including sheets being fed incorrectly and damaged printer rollers. Make sure you set the paper or media type in your printer to print on labels. When printing stacks of label sheets, you should print one at a time or make sure that the sheets are separate and not clinging to each other. You can use Avery labels with Sure Feed technology, which reduces printer jams by providing a more reliable feed through your printer.
Smearing or smudging
Q: Why is the print smearing?
A: The most common cause of smearing will be because the labels are not compatible with the printer. Double-check and make sure that the labels you are using are compatible with your printer type. Don’t try using labels for laser printers in an inkjet printer.
Blank margin around the label sheet
Q: Why is there a blank white margin around the sheet?
A: Many printers are not able to print to the edges of the sheet. This can leave behind a blank margin around the page. Print a test sheet to see if your printer is able to print with full bleed. Or you can try using print-to-the-edge labels to work around this.
8. Print your labels
After making any final adjustments, go ahead and print again on the label sheets.
Again, if you’re not sure if printing labels yourself is for you, then have our team of experts print your products for you. Avery WePrint prints perfectly aligned, full-color labels, stickers, cards, tags, and more with a fast turnaround of as few as three business days.
If you still need help, you can contact our consumer care center and they’ll be happy to help you with any of your designing, printing, or ordering questions.


I have avery easy peel template 5160 labels. I have a new Canon TR4522 printer. I am not able to figure out how to print addresses on these labels. Please tell me how to set my computer up to print these labels.
Thank you,
Tami
Hi Tami,
If you need assistance printing on the labels, follow these Printing Steps. If you need help inputting information onto the template we suggest reading this Create and Print article. If you still need assistance, please call our Care Team at (800) 462-8379. They would be happy to help you!
I am attempting to print 65 return addresses on Avery L7651 template. I set up the blank template, type in the address on the top left hand box, hit the print button but cannot get the 65 addresses to appear on the resulting sheet; no matter how hard I try only the top left hand prints, together with 64 blank boxes. What is the correct printing procedure please?
Thank you for your anticipated resolution to this problem that is driving me scatty.
Seamus O Dunlaing
Hi Seamus,
It looks like you are using products from our UK division. You’ll need to reach out to our UK office at 0800 80 50 20 between 9am and 5pm Monday to Friday. Sorry, we’re unable to help you out but our products and templates aren’t exactly the same. Hope you get the help you need!
Could teach me how to make reverse images so that I am able to use as iron-on transfers
for T-shirts/sweatshirts?
Thanks.
In Design & Print Online, after you design your light transfer, you will go to Preview & Print and select Get PDF to Print. Once you open the PDF, your design will automatically be reversed for printing. If you have additional questions, please reach out to our Care Team at 800-462-8379.